
This is page 1 of 4. Other pages: 2, 3, 4.
Introduction
This series will explore and break down the following aspects of building for Directed Energy Weapon performance:
- Builds & Gear
- Free 2 Play – For those who have been level 65 for circa 2 months
- The Moderate Investor – For those that have a grasp of the game and are ready to invest somewhat to progress
- The Meta Builder – The ideal setup, fully invested to push their DPS as high as they can within the game
- Abilities, Tray Layout, Keybinds, Activation Orders, Pre-buffing and manual activations.
- Spike Damage, Sustained Output, Target Selection and Piloting
The most effective Directed Energy Weapons can be broken down into these categories:
- Beam Arrays (used for tanking and broadsiding, with the widest firing arc outside of Turrets and Omnis)
- Dual Beam Banks (used in front arc Beam Overload Builds for effective single target damage output)
- Dual and Dual Heavy Cannons (used in a narrow front arc Rapid Fire (single target) and Cannon Scatter Volley (single and AOE target))
An honourable mention is given to single cannons, but they are not widely used in builds.
This series will focus on the use of Dual and Dual Heavy Cannons and Firing Mode Cannon: Scatter Volley, to benefit from the area of effect damage output from picking up multiple targets in a firing arc, however there are examples where combining Rapid Fire and Scatter Volley can be effective – I have adopted this in the Free 2 Play example.
All weapons will adopt the available Damage Modifiers, with Damage/Critical Severity selected for the Epic Modifier.
To operate a cannon build, it should be considered essential to use a vessel with a Tactical or Universal Commander Seat. This is important so as to make Cannon: Scatter Volley available at the highest rank iii. We will however explore examples, like the Gagarin, that only have Lieutenant Commander available.
All builds will be using Phaser. It is of the most powerful options and the most widely available and customisable Type.
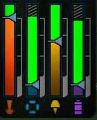
Directed Energy Weapons require power management and accordingly, I would recommend investing fully into Weapons, minimising Shield and Auxiliary and placing remaining power into Engines. Shown below:
Ship Selection
5 fore is ideal, though 4 fore is not unreasonable for those not yet seeking meta-level builds. Rear loadout is flexible for F2P, though Moderate and Meta builders will want 3 rear slots.
Escorts, Destroyers, Warships and Juggernauts will be the preferred vessels, whilst battlecruisers and raiders make for interesting alternatives.
Boff Layouts of Commander Tactical, Lieutenant Commander Engineering and Lieutenant Science make for effective core combinations for these builds.
Part 1 – Free to Play – T4 Tactical Escort (“Defiant”)
Rewarded by selecting Escort when levelling and selecting a T4 Option.
Design
A 4 forward/2 rear fast, nimble but inherently squishy escort. Only 7 console slots on the T4. A vessel that packs a punch, but is easy to fly and forgiving of piloting error.
Gear
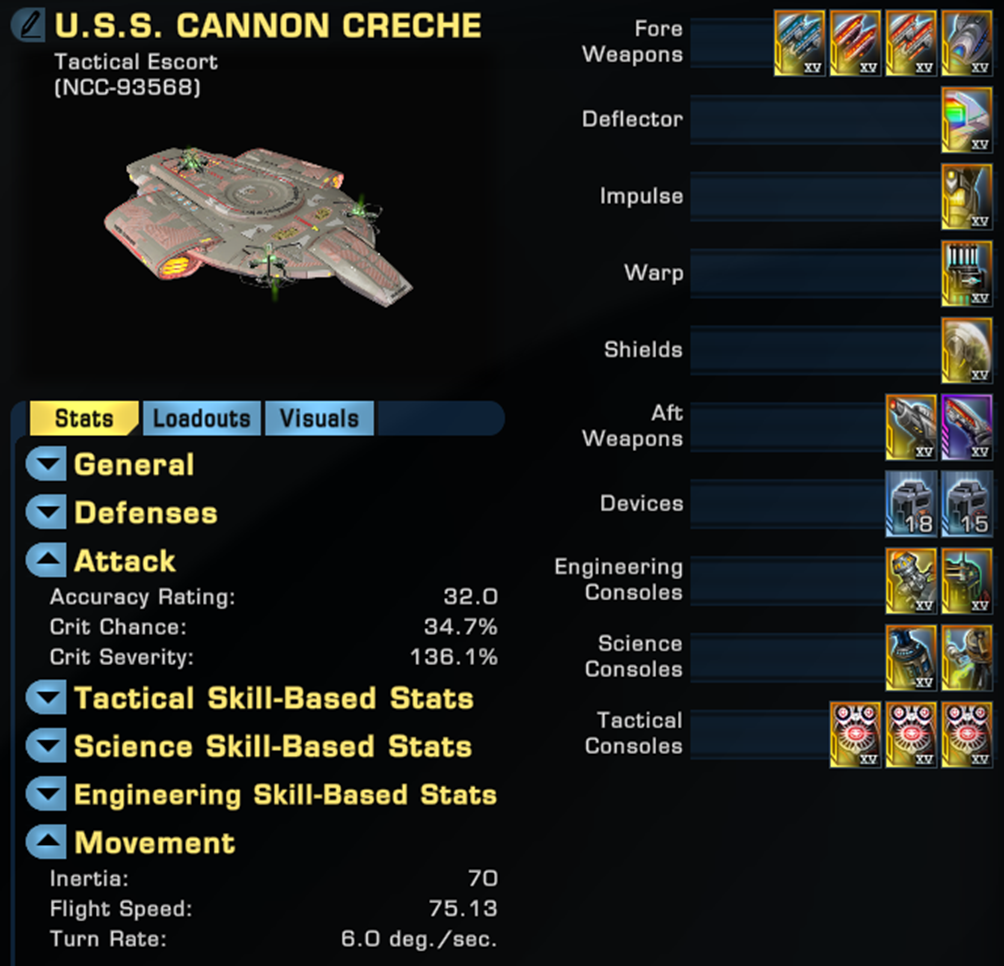
Front: Quantum Dual Heavy Phaser Cannon (Mission – Sunrise). Prolonged Engagement Phaser Dual Cannon (Phoenix Store). Crafted Dual Heavy Phaser Cannon. Dark Matter Quantum Torpedo (Discovery Rep Tier 1) Note: Torpedo could be replaced with another Crafted Phaser Cannon
Rear: Trilithium Phaser Turret (Mission – Beyond the Nexus). Crafted Phaser Turret.
DECS: Fleet Colony Deflector (Fleet), Bajor Defense Engines and Shield (Mission – Scylla and Charybdis) and Fleet Plasma Integrated Warp Core (Fleet).
Devices: Energy Amplifier and Target Lock Amplifier
Consoles – Reinforced Armaments (Mission – Beyond the Nexus), Assimilated Module (Omega Rep), Quantum Phase Converter (Mission – Sunrise), Prolonged Engagement Power Dynamo (Phoenix Store), Phaser Vulnerability Locators x 3 (Fleet)
Bridge Officer Seating
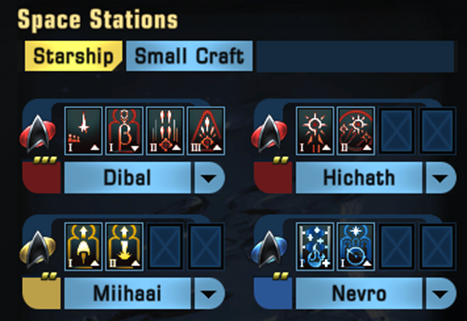
There are way too many Tactical Bridge Officer skills and for a new player, without the EC to buy the likes of Kemocite Laced Weaponry or the rep to use Prevailing Engines, there is inherently some ability overlap. For this reason, the use of a Torpedo and its associated torpedo abilities make an effective build selection.
Hazard Emitters cleanses debuffs applied by the Borg and undertakes a heal, which is needed on escorts such as these.
Traits
Without acquiring ships or accessing the exchange, we have to use what is available without any expenditure:
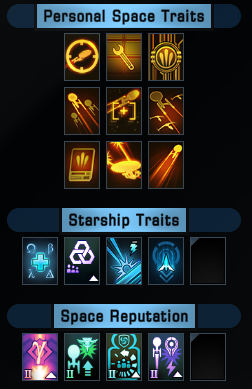
Personal Traits
Accurate: +10 Accuracy – Accuracy converts to Crit Hit
Bulkhead Technician: +10% Max Hitpoints
Deft Cannoneer: +10% Intertia and +1 Turn Rate for 30 seconds when activating a Cannon Ability
Fleet Coordinator: +2% Bonus (Cat2) Damage per Team Member
Elusive: +10 Defense
Innocuous: +5% Crit Severity and -25% Threat
Cannon Training: +5% Bonus (Cat2) Cannon Damage
Operative: +1% Crit Chance and +2% Crit Severity
Thrill Seeker: +15% Flight Speed
The prioritise to replace would be Bulkhead Technician, Elusive and Thrill Seeker.
Ship Traits
The Best Defense (Mission – House Pegh): Attack Patterns Grant +25% Hull Healing for 30 seconds
Predictive Algorithms (Intel Specialisation): Removes a debuff and grants +% accuracy when activating a weapon enhancement (for 30 seconds and stacks 4 times)
Unconventional Tactics: Brace for Impact grants 15% bonus damage for 15 seconds
Non-Linear Progression (Temporal Specialisation): Reverse provides buffs
Space Reps
Magnified Firepower: +5% (Cat2) Damage at Tier 4 Rep (Increases to 6.3% at Tier 6) – Gamma Rep
Precision: +4% Crit Chance at Tier 2 Rep (Increases to 5% at Tier 4) – Romulan Rep
Chrono-Capacitor: +7.5% Bridge Officer Recharge Speed at Tier 2 Rep (Increases to 9.4% at Tier 6 Rep) – Temporal Rep (Note: This is a key part of your early cooldown reduction)
Advanced Targeting Systems: +16% Crit Severity at Tier 2 Rep (Increases to 20% at Tier 6) – Dyson Rep
As a new player, you may well not be able to fill your traits and that is fine. It wont hold you back much and you can achieve respectable numbers, as I demonstrate later.
Duty Officers
I am using a rare crit severity and critical hit pair of duty officers, but a new player can use uncommon green variants for a which may cost 250k EC.
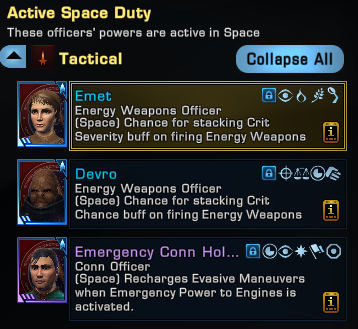
The Emergency Conn Hologram is obtained from the Pheonix Store with a token. This duty officer allows for a resetting of Evasive Manoeuvres by clicking EPtE. This is important to travelling around the map quickly.
You are welcome to tailor your other two slots to your individual preferences at a F2P stage.
Trays
This section is where we start to move away from the traditional build questions and get into the grit of what can actually start boosting your performance. Gear is only one factor in a build, but is often given far too much weight.
Abilities fall into a range of categories:
- Buffs and Debuffs
- Heals and Damage Mitigation
- Cooldown Reduction
- Damage Output
How you use them and interweave them will very much determine how you perform.
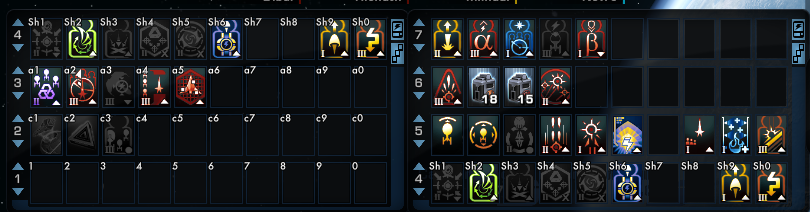
Looking at my tray above:
Tray 2 holds the mission reward distress beacons – the ships called in to support me in combat. I tend to use Swarm Distress Beacon at the start of a run and the Delta Beacon if available late in the run.
Tray 3 is the long cooldown buffs, including Intelligence Fleet, Tactical Initiative (major CD reduction for first 45 seconds), Fire on My Mark, Tactical Fleet and Expose Vulnerability. Tray 3 is activated 8 seconds before combat begins and I use ALT at the keybind for this. Fire all weapons is also bound into this key so that it is activated periodically.
Tray 4 consists of Manual Clicks, which include my Threat Mitigations, Focus Frenzy (used on a big target), 5 minute rep clickies, and my speed boosts (which work closely with my Emergency Conn Hologram Doff to reset my Evasive Manoeuvres).
Tray 5 consists of Manual Clicks, which holds my damage mitigations, but also in this case, my Cannon: Rapid Fire (used on a single target).
Tray 6 is my spam bar, which is bound to SPACE. It holds no abilities that have a delayed activation as these can interrupt firing cycles.
Tray 7 is bound to my side mouse button and is my buffs and debuffs along with Photonic Officer for Cooldown Reduction. These abilities have delayed activations and so are held in a separate key. These are activated 6 seconds before combat begins and then as they come available again during combat. On this Free 2 Play build, there are very few abilities so this is a particularly short tray.
Piloting and Practical Application
Now in practice, what happens is:
Set Engines to full power.
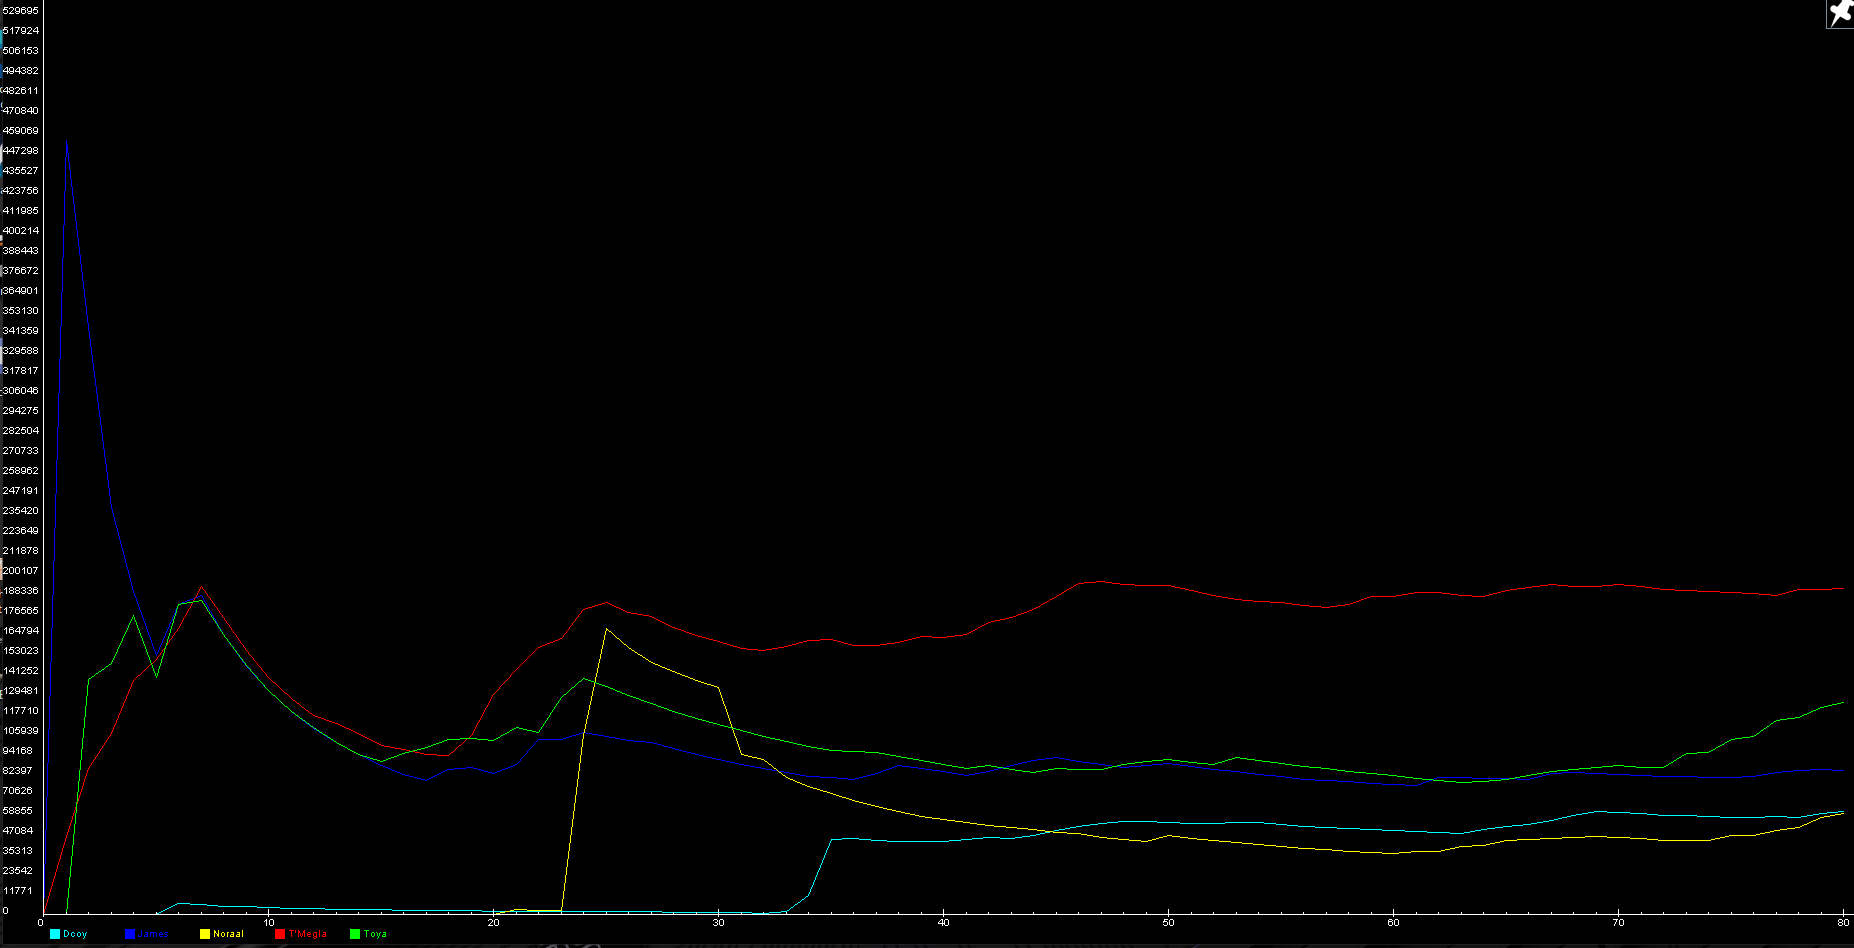
We prebuff ourselves before combat begins so that we can spike our damage output on the initial pack in an instance such as Infected Space: Advanced. This is shown below – look how the red and blue lines have an initial jump:
To do this, we activate Tray 3, 8 seconds before combat begins and once those abilities have been activated, we activate Tray 7. Doing so makes the ship fully buffed in the short distance until combat begins and will take you to around 2 seconds before combat starts.
We then click on Evasive Manoeuvres in those last 2 seconds and spam Tray 6, which will activate as combat starts.
With Evasive Manoeuvres, it takes a second to close into pack on ISA and we stop the ship about 4 km from the targets, reversing as necessary so that the targets remain in our forward arc.
Keep an eye on Emergency Power to Engines in tray 4 because we want to activate that whilst Evasive Manoeuvres is in Cooldown so as to reset the Cooldown.
When the Centre Pack is dead, we can Evasive Manoeuvres to the left pack and you should now be in a general rotation of your abilities. You can see how this works in practice in the below video, which will also give an understanding of the piloting process.
Below is a link to an example run so that you can see the tray clicking and activations including the piloting.
In this run, the build performed an 84k dps run – very respectable for a new player flying just a T4 ship in their first few months of the game. This also gives you the growth opportunity as you progress to a T5-U or T6 ship later, which is demonstrated in the next part of the series.
STO – ISA – F2P T4 Defiant Cannon Build – 84k – YouTube
Notes
I have an endeavour rating of 110, which a new player will not have, however this would be offset by a player flying a T5-U or higher vessel.
Key Components of this build are the Tactical Locator Consoles, Prolonged Engagement 2Pc, Trilithium 2Pc, Cannon: Scatter Volley and Photonic Officer; Chrono-Capacitor Space Rep and the Emergency Conn Hologram.