
This is page 3 of 4. Other pages: 1, 2, 4.
Part 3 – The Meta-Builder for Advanced Content
Entering Part 3 of the series, this explores those harder to reach items that require heavy investment that have tended not to be accessible to most of the player base. That doesn’t mean this section is not worth a read as you may be surprised at how little difference some of these build parts have in comparison to what we have covered in Part 2.
We will again cover two examples; one being a lockbox ship (Mirror Warship) and the other, a promo ship (Vaadwaur Miracle Worker Juggernaut). These examples are built for ISA.
Lockbox – T6-X Mirror Constitution Warship – Build for ISA
At this level of building, a vessel can be capable of hundreds of thousands of dps per second and this in turn can make ISA runs as short a 1 minute. This means that the build is tailored to the anticipated high damage output and short run time and this most notably changes how we deal with Cooldown Management.
Design: Upgraded with a T6-X Token. Like the Vanguard Warship we looked at in Part 2, the Mirror Warship is manoeuvrable, with the ideal 5 forward/3 rear layout and Mastery suited to damage output. New Consoles and Traits come available and these make for interesting changes in the build.
The vessel is an Intel ship and, as such, has a Lieutenant Commander Intel/Universal Seat. In addition, she holds two Commander Seats, one Tactical and the other Engineering and this gives great options for the build.
The Mirror Warship comes with a meta trait, Terran Goodbye (I’ll discuss this trait later).
Gear

No change to the Vanguard Warship for weapons and DECS – this is our first choice setup for damage output.
Front: Terran Task Force Dual Heavy Cannon (Terran Rep), 22.c Wide Angle Phase Cannons (Lobi Store), Phaser Quad Cannons (150,000 Dilithium for Sao Paulo Tactical Escort Refit), Prolonged Engagement Phaser Dual Cannon (Phoenix Store), Sensor-Linked Dual Heavy Phaser Cannons (Infinity Lockbox/Exchange).
Rear: Trilithium Phaser Turret (Mission – Beyond the Nexus), Altamid Modified Plasma Omni (Lobi Store), Altamid Modified Kelvin Torpedo (Lobi Store)
DECS – Fleet Colony Deflector (Fleet), Prevailing Innervated Impulse Engines (Competitive Rep), Fleet Plasma Integrated Warp (Fleet), Tilly’s Review Pending Modified Shield (Discovery Rep).
Devices – Energy Amplifier, Target Lock Amplifier, Deuterium Surplus, other of choice
It should be noted that the Temporal Negotiator and Kobayashi Maru Device should be used if available.
Consoles – Lorca’s Custom Fire Controls (Discovery Rep), Altamid Modified Swarm Processor (Lobi Store), Reinforced Armaments (Mission – Beyond the Nexus), DOMINO (Epic Starter Pack – Bajoran Interceptor), M6 Tactical Computer (75,000 Dilithium from Temporal Escort), Dynamic Power Redistributor Module (Atlas Prototype Dreadnought Cruiser – Lockbox/Exchange), Bio-Neural Infusion Circuits (Lobi Store), Phaser Vulnerability Locators x 5 (Fleet).
As the Mirror Warship has an extra console slot to the Temporal Vanguard Warship, at significant cost, we introduce DPRM.
What does it offer?
DPRM is considered the best console in the game. 11.2 Energy Damage Resistance, 17.8% DEW Damage and a truly exceptional clicky – +40% Bonus Damage – reapplied every 1 second for 20 seconds as long as health is above 80%. +100 Bonus Damage Resistance Rating for 20 seconds and +500% hull regen per minute for 20 seconds.
If survival is not an issue, it provides a considerable damage boost, but also, when taking damage, it is a truly excellent last line of defense that keeps you in combat and keeps you alive.
We spent some considerable time debating whether the Point Defense Bombardment Warhead Console should replace Bio-Neural Infusion Circuits. PDBW would not be part of the build for what it offers, (+25% Projectile Damage and 1% Critical Chance) but what it does alongside DPRM for the build. The 2 Pc grants 33% (Cat1) Phaser Damage for DEW. (Or Disruptor or Plasma), so useful on other build types too.
However, we reached the conclusion that we were heavily invested in Cat1 damage and so, the addition of the 2 Pc was not in our favour and instead the Cat2 Bonus (crit) in Bio-Neural Infusion Circuits was more valuable to the build.
Bridge Officer Seating
The Commander Tactical Seat allows for an ideal setup, where Cannon: Scatter Volley III is in place, supported by Attack Pattern: Beta II. Distributed Targeting I and Kemocite Laced Weaponry II are place fillers. The Ensign Tactical is used for Beams: Fire at Will I and the purpose of this is a trigger for our Prevailing Innervated Engines, giving an at will 350% boost to speed and turn rate.
In the Commander Engineering Seat, you will note no use of Auxilliary to Battery. It does not form part of our Cooldown Management as our performance renders ISA to end so quickly, that it is not needed. We do keep our usual EPtE and EPTW III combo. A filler in the form of Let it Go II takes the Lieutenant slot as a small additional damage output, whilst Directed Energy Modulation III fills the Commander Slot for a notable buff to our DEW Cannons.
In the Intel Seat, we have adopted Science. Intel Team provides a Threat Mitigation and Override Subsystem Safety III is in use in the Lieutenant Commander slot. This boosts all power levels for 20 seconds, which is providing a damage boost through the AMP modifier in the Fleet Deflector and also granting power to your weapons. The drawback, is that after those 20 seconds a subsystem will go offline for 5 seconds.
I have not compensated for this risk, however you could by placing Engineering Team II in the Engineering Lieutenant slot. When a subsystem goes offline, clicking Engineering Team cancels it out. Why do I not do this – I don’t notice the power going offline in a busy and fast TFO.
Photonic Officer I is in use in the Universal Lieutenant Slot and this does form part of our Cooldown Reduction, whilst Delayed Overload Cascade I is in use on the Ensign Universal slot for a further damage boost.
Traits
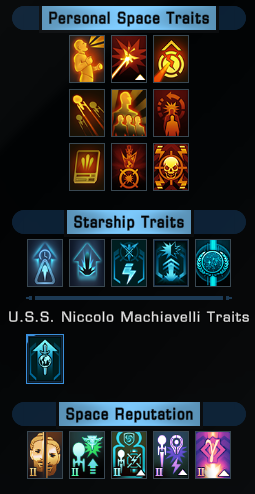
Personal Traits
These remain unchanged on this build, from those builds in Part 2 – The Moderate Investor
Ship Traits
Emergency Weapons Cycle (Arbiter/Kurrak/Morrigu – CStore): Emergency Power to Weapons reduces Weapon Power Cost by 50% for 30 seconds and grants 20% Firing Cycle Haste for Energy Weapons for 30 seconds
Withering Barrage: (Legendary Defiant Pilot Warship / Valiant Tactical Escort / Kor Bird-of-Prey / Legendary B’rel Bird-of-Prey / M’Chla Bird-of-Prey Refit / Legendary T’liss Light Intel Warbird / Malem Light Warbird): Extends Cannon: Scatter Volley by 4 seconds
The Ruin of our Enemies: (D7 Miracle Worker Flight Deck Carrier – Promo): When you defeat a foe you gain 2% (Cat2) Damage for 30 seconds, resetting with every kill and stacking infinitely. Every fifth defeat while active will reduce Recharge Time to Bridge Officer Cooldowns by 15% over 5 seconds.
Let’s consider this ability. It only works if you are the killing shot, so should only be used where you feel that you will be the overwhelming force in a TFO. At this stage, this build generally is this. In turn, in these fast runs, the Cooldown Reduction forms a viable part of your Cooldown Management.
Over-Powered and Over-Gunned (Legendary Defiant Pilot Warship – 10th Anniversary Legendary Bundle): On Beam or Cannon Firing Mode Activation: Reduces Weapon Power Cost by 15% for 5-10 seconds and grants 12.5% Firing Cycle Haste for Weapons for 5-10 seconds (5-10 seconds is based on global Critical Strike Chance).
Heart of Sol (Note: each Faction has a different name for this trait): (Edison-class Temporal Warship / Jem’Hadar Vanguard Temporal Warship / Kholhr-class Temporal Warbird): Attack Pattern Beta or any Temporal Operative Bridge Officer ability grants 10% Firing Cycle Haste for Energy Weapons for 20 seconds and 5% (CAT2) Phaser Damage for 20 seconds
Terran Goodbye (Mirror Constitution Warship – Lockbox): When you defeat a foe: Gain 25 Accuracy Rating and 5% Critical Chance for 20 seconds, stacking 3 times.
This is a considerable amount of critical chance as accuracy convert into critical chance too.
Space Rep Traits are unchanged from builds in Part 2 – Moderate Investor.
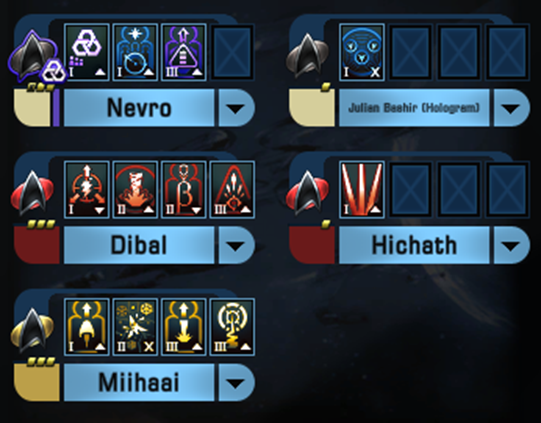
Duty Officers
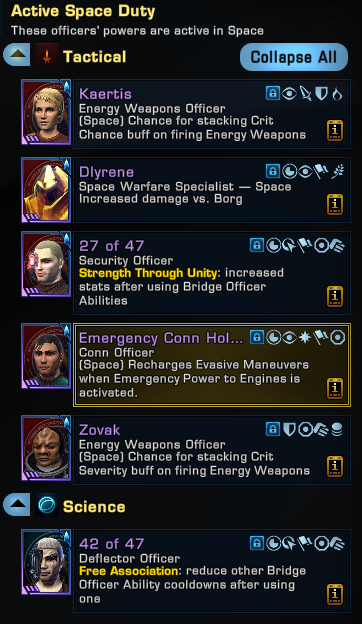
I have now upgraded the duty officers.
The Rare crit severity and critical hit pair of duty officers, are now Very Rare. Each will cost in excess of 100m EC. The upgrade from Rare is NOT necessary and the difference is negligible.
Dlyrene grants 10% (Cat1) damage against borg. Cost is circa 5-10m EC and there are an array of alternative doffs and some I have already covered previously.
27 of 47 is the most expensive duty officer in the game, granting both critical chance and critical severity on the activation of Tactical and Intelligence bridge officer abilities. This duty officer is currently costing 470m EC and again, is NOT necessary. Meta Builders are using this duty officer, but the rare crit doffs mentioned previously are fine alternatives for a % of the cost.
The Emergency Conn Hologram is obtained from the Pheonix Store with a token. This duty officer allows for a resetting of Evasive Manoeuvres by clicking EPtE. This is important to travelling around the map quickly.
Finally, 42 of 47 is in use. This duty officer will currently cost about 20m EC and forms part of the Cooldown Management, reducing the recharge time of Intelligence and Tactical abilities respectively.
The final part of the Cooldown Management Strategy is the use of Tactical Initiative, which if you recall, is activated in the 10 seconds before combat begins and grants 45 seconds of bridge officer cooldown. So from Combat beginning we are gaining a 30-35 second benefit, which is about 50% of an ISA run usually.
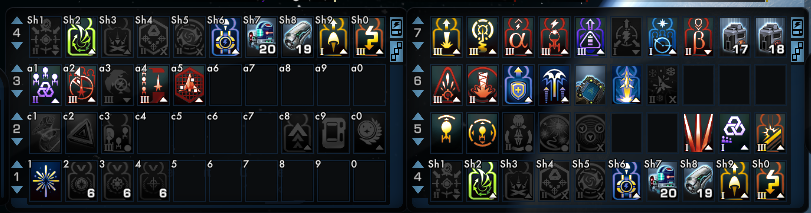
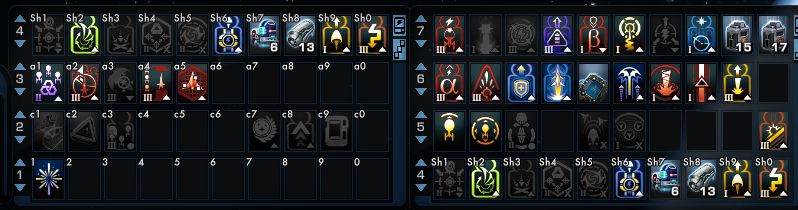
Trays and Activations
The tray is unchanged now and you can refer back to Part 2 – Moderate Investor for more information, but this should now be familiar to you.
Likewise, buffing, activations and piloting should all reflect what we have covered previously.
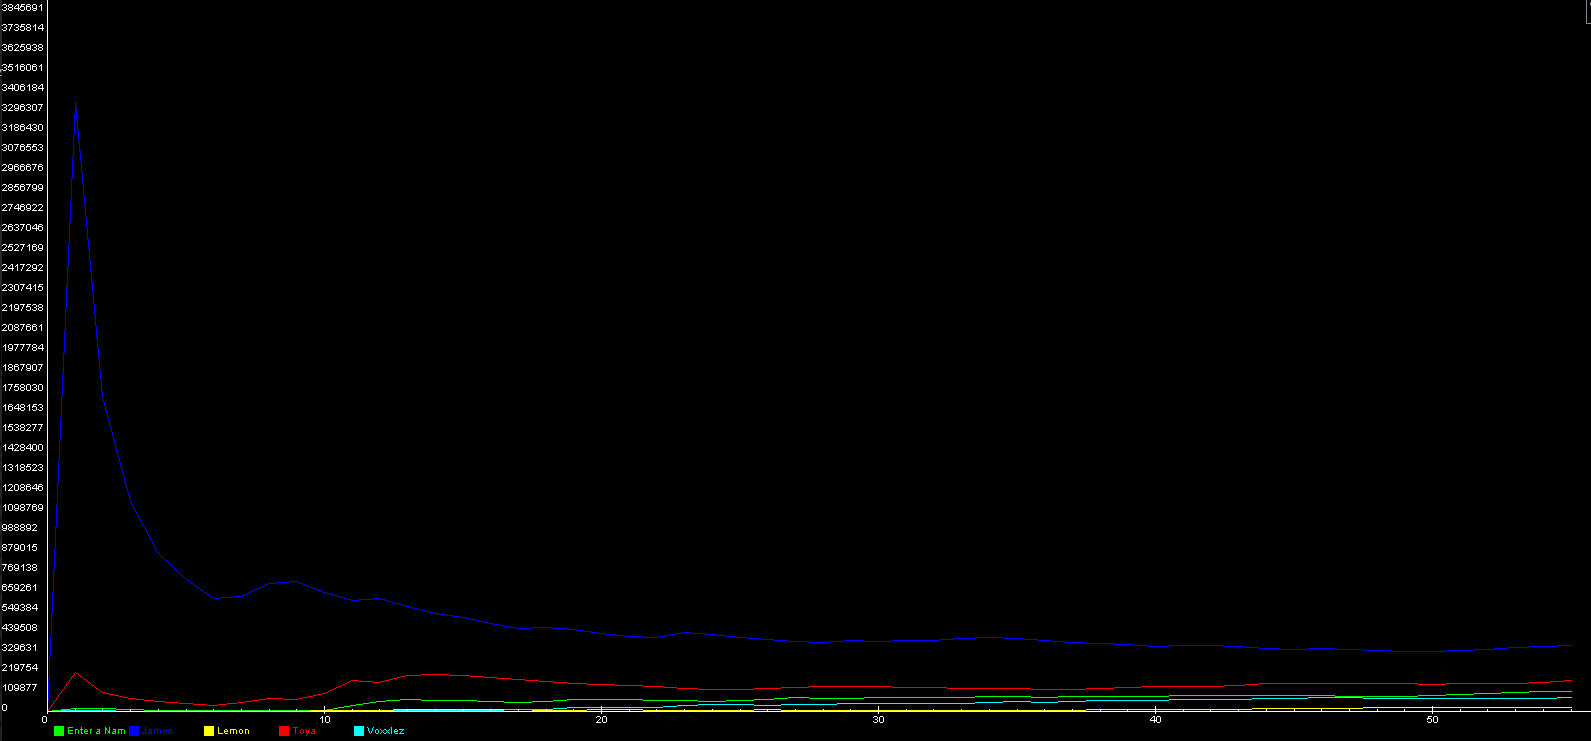
Let’s look at what actually happens in combat now. We prebuff a full 10 seconds before combat begins, so that we can spike our damage output on the initial pack in an instance such as Infected Space: Advanced. This is shown below – look again how only the blue line has an initial jump. For the run undertaken in the Mirror Constitution Warship, this spike reaches 2.3 dps; a further 500k more than the Temporal Warship did.
Have you noticed how each step of our build process has exponentially increased the output of our initial spike, as a result of build, prebuffing and being first to target.
Below is a link to an example run so that you can see the tray clicking and activations including the piloting on the Mirror Constitution Warship. In this run, the build performed an 257k dps run.
Notes
I am sure the ship will do more than that, but it is interesting to see that, at the cost of a Mirror Warship (900m EC), at the cost of acquiring DPRM now (1bn EC), Duty Officers (750m EC) and Ruin Trait (400m EC for me, but most new players would have to pay 1.5bn for the ship) there is not much in the progress anymore. We are at a stage now that our changes are eking out small percentage changes at great, great cost.
The Vaadwaur Juggernaut is an exception to this rule however, and there is a reason it is indisputably the top spot DEW Cannon Vessel in the game and we can look at that in our next review.
STO – ISA – T6 Mirror Warship – 257k – YouTube
Promo Box – T6-X Vaadwaur Miracle Worker Juggernaut – Build for ISA
The Vaadwaur Juggernaut deals unrivalled Directed Energy Weapon Damage. It was built by Spartan, a Developer that both understood this aspect of the game and created a specific project to push DEW to the maximum possibility at the time of its creation; the result was this exceptional vessel.
However, let me caveat this with my own experience and a word of warning. Yes, this vessel is the undisputed pinnacle of DEW. However, its potential is locked behind the mastery of piloting in Star Trek Online. The vessel is like a locked door, and behind that locked door is unrivalled damage output by an Energy Build; but the key to unlock that door is the ability to pilot a vessel with an Inertia Rating of 20 and a Turn Rate of 6. Do not underestimate how much of a constant challenge that is.
If piloting is not for you and you neither have the energy to invest in practicing or the willpower to stay the course, do not buy this ship as it will likely be a costly disappointment for you. However, if you put the time into everything that Sukobi and I have covered in this series; builds, trays, prebuffing, cycles, speed activation and management and then in addition, you put the time into learning to pilot this vessel respectably and watch my piloting videos, you will achieve results that have not previously been accessible to you and you will have a great time doing so.
This vessel comfortably dishes out hundreds of thousands of dps per second and as such, ISA runs are regularly 1 minute. So, like the Mirror Warship, the build is tailored to the anticipated high damage output and short run time and the associated Cooldown Management is adopted again.
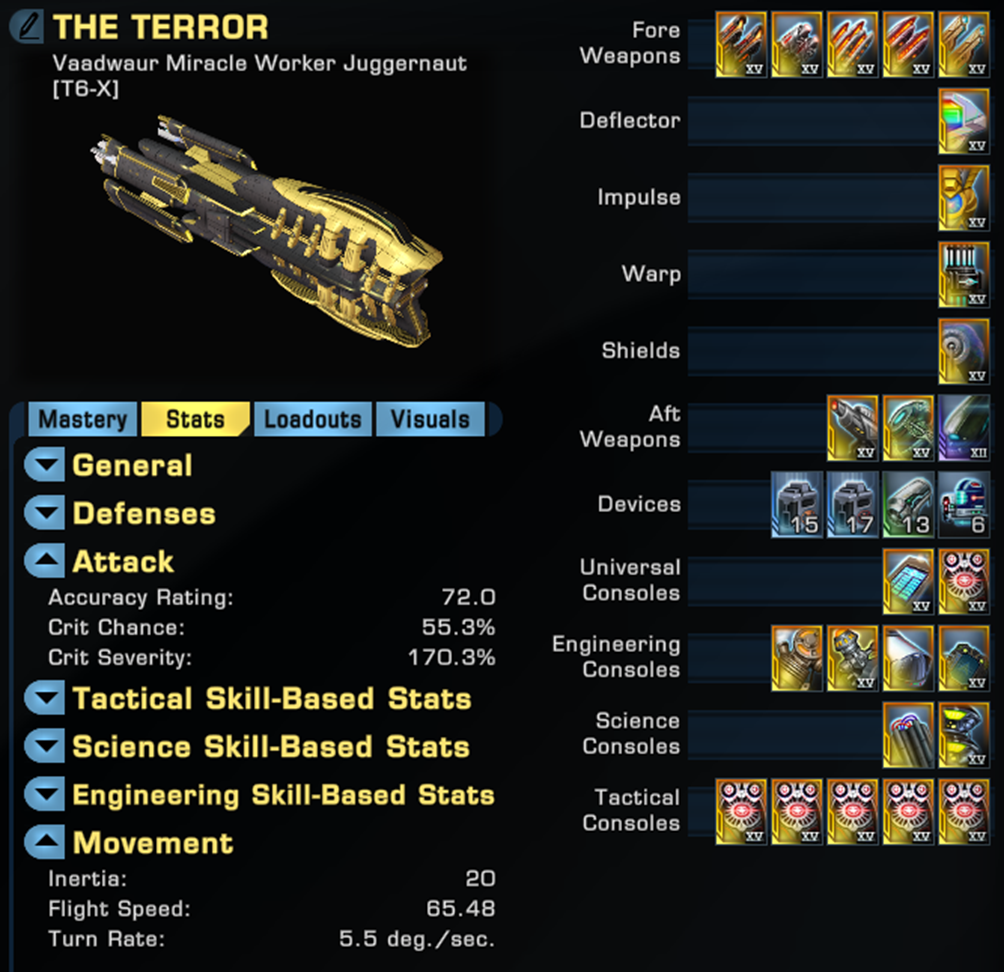
Design: Upgraded with a T6-X Token. The Juggernaut is a heavy, slow, lumbering super oil tanker of the open ocean of space. It holds the now mandatory 5 forward/3 rear layout and an aggressive Mastery. As we have spoken of Mastery, let’s look at it in detail for the first time:
I Devastating Weaponry +2.5% Critical Chance.
II Enhanced Weapon Banks +15% Critical Severity.
III Rapid Repairs Regenerates 1.25% of your maximum hull every 3 seconds in Space.
IV Enhanced Weapon Systems +10% Kinetic Damage.
+10% All Energy Damage.
The vessel is our first Dual Specialist Specialisation Bridge Officer Seating Intel ship and, part of the formula of this ship is how perfectly applied that seating distribution is. It has a Commander Tactical/Miracle Worker seat and a Lieutenant Commander Tactical/Intel seat. She is complemented by a Lieutenant Commander Engineering, Lietuenant Science and Universal Tactical layout.
The Vaadwaur Juggernaut also comes with a previously meta trait, Weapon Emitter Overdrive, but this has fallen out of favour when the Mirror Warship arrived with Terran Goodbye. The issue with WEO is that for access to its 10% critical chance and 50 accuracy rating, it came at a cost of increasing weapon power drained by weapons by 50%, and this is a costly drawback for DEW builds.
Gear
No change here or with DECS.
Front: Terran Task Force Dual Heavy Cannon (Terran Rep), 22.c Wide Angle Phase Cannons (Lobi Store), Phaser Quad Cannons (150,000 Dilithium for Sao Paulo Tactical Escort Refit), Prolonged Engagement Phaser Dual Cannon (Phoenix Store), Sensor-Linked Dual Heavy Phaser Cannons (Infinity Lockbox/Exchange).
Rear: Trilithium Phaser Turret (Mission – Beyond the Nexus), Altamid Modified Plasma Omni (Lobi Store), Altamid Modified Kelvin Torpedo (Lobi Store)
DECS – Fleet Colony Deflector (Fleet), Prevailing Innervated Impulse Engines (Competitive Rep), Fleet Plasma Integrated Warp (Fleet), Tilly’s Review Pending Modified Shield (Discovery Rep).
Devices – Energy Amplifier, Target Lock Amplifier, Deuterium Surplus, other of choice
Consoles – Lorca’s Custom Fire Controls (Discovery Rep), Altamid Modified Swarm Processor (Lobi Store), Reinforced Armaments (Mission – Beyond the Nexus), DOMINO (Epic Starter Pack – Bajoran Interceptor), M6 Tactical Computer (75,000 Dilithium from Temporal Escort), Dynamic Power Redistributor Module (Atlas Prototype Dreadnought Cruiser – Lockbox/Exchange, Bio-Neural Infusion Circuits (Lobi Store), Phaser Vulnerability Locators x 6 (Fleet).
As a Miracle Worker vessel, we gain the extra universal slot and this is one of the big things pushing the juggernaut above the competition as, in addition to 5 tactical console slots, it gains 2 universal slots that allow for the Lorca console and an extra tactical Vulnerability Locator to be slotted.
At no stage have we discussed those Locators, so let’s cover that now, why are they so important:
Each grants 39.4% (Cat1) Phaser Damage and 2% critical chance. Across the full suite that is significant. Often, players ask, when can I start switching out Locators for Exploiters (10% critical severity instead of 2% critical chance). The answer is you don’t. Critical chance is hard to obtain and there are more beneficial modifiers to gain from Starship Traits, such as the all important haste we discussed in Part 2. As you can see below, this vessel has a standing 55% crit and in combat, that rises to 95%, which is the ideal number.
Bridge Officer Seating
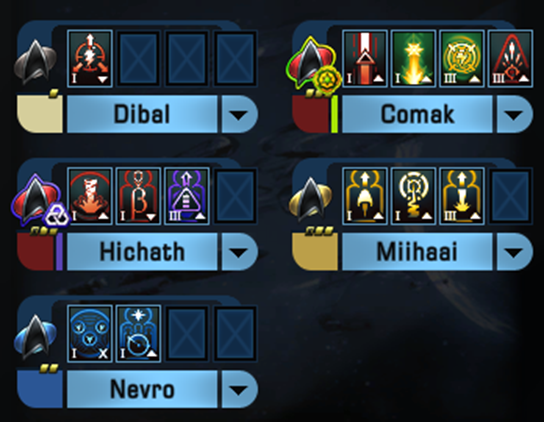
The Commander Tactical/Miracle Worker Seat requires a little compromise so that Cannon: Scatter Volley iii holds its Commander slot. We have covered in the Gagarin Build what MAS and NSB are and you can refer back for more detail. Here, MAS III is reduced to MAS I in the Lieutenant slot; this grants a 30% (Cat2) damage boost to our weapons. NSB III remains. This could be structured different and NSB III reduced to NSB II, whilst MAS I jumps to MAS II in the Lieutenant Commander slot, but the difference between these options is rather negligible. The 3 Ensign slots used for Tactical are used for Beams: Overload as the trigger for our Prevailing Innervated Engines, giving an at will 350% boost to speed and turn rate. Fillers of Distributed Targeting I and Kemocite Laced Weaponry I are also in use.
In the Lieutenant Commander Engineering Seat, we maintain our preferable EPtE and EPtW III combo. Whilst the Lieutenant slot is occupied by Directed Energy Modulation I for a buff to our DEW Cannons.
In the Lieutenant Commander Intel/Tactical Seat, Attack Patter: Beta accompanies Override Subsystem Safety III, which we discussed on the Mirror Warship Build.
The Lieutenant Science Seat is in use by Delayed Overload Cascade and Photonic Officer I, following the same Cooldown Reduction Strategy as was present on the Mirror Warship.
Traits
No change here from the Mirror Warship.
Duty Officers
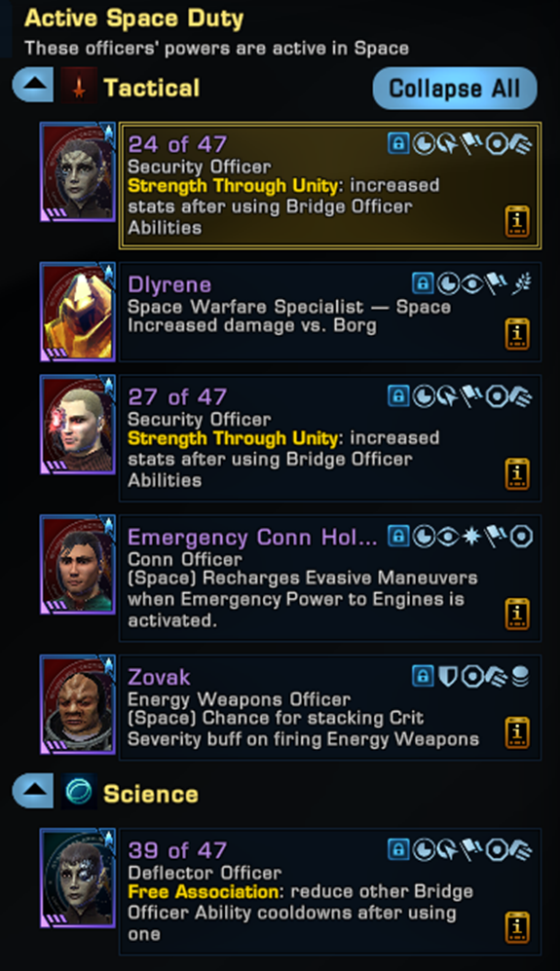
Two changes from the Mirror Warship.
I have dropped the Very Rare Critical Hit Duty Officer in favour of 24 of 47. Cost is circa 200m EC. The duty officer grants Max Power for 5 seconds, which gives a damage boost from the deflector’s AMP modifier and miracle worker abilities grant critical hit.
Finally, instead of 42 of 47, I am using 39 of 47, which is the same thing – forming part of the Cooldown Management, reducing the recharge time of Miracle Worker (Not Intelligence) and Tactical abilities respectively.
The remaining Cooldown Strategy is the same as the Mirror Warship.
Trays and Activations
The tray is following our same patterns and if you refer back to the Gagarin in Part 2 – Moderate Investor and the Mirror Warship previously, the below tray will have a familiar layout.
Likewise, buffing, activations and piloting should all reflect what we have covered previously.
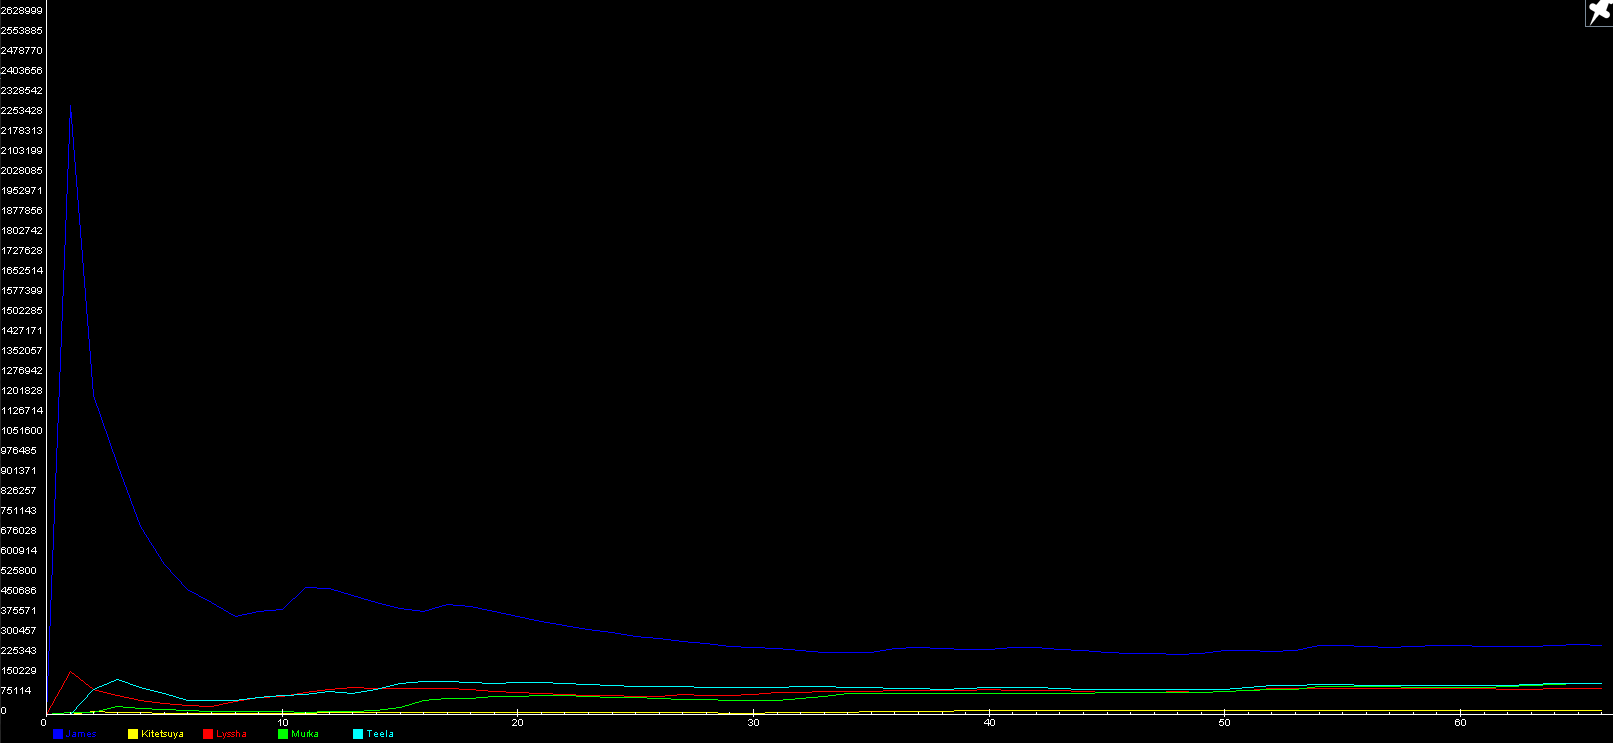
Now, back Into the Valley of Death Rode the Six Hundred – Let’s look the combat review. Prebuff so that we can spike our damage output on the initial pack in an instance such as Infected Space: Advanced. This is shown below – look again how only the blue line has an initial jump. For this run undertaken in the Vaadwaur Miracle Worker Juggernaut, this spike reaches 3.3m dps; a full 1m more than the Mirror Warship before her.
Below is a link to an example run so that you can see the tray clicking and activations including the piloting on the Vaadwaur Miracle Worker Juggernaut. I would really recommend watching this one to gain an idea of how complex the piloting is and you will note my piloting errors and the impact it has on getting to target and positioning.
One particular error to note is the mistake made at the end killing the second Transformer. You will see I have no speed boost available when I need it and as the ship is so hard to manoeuvre, I can only swing myself to the far side of the gateway, which costs both time and output.
STO – ISA – T6 Vaadwaur Juggernaut – 358k – YouTube
Regardless, in this run, the build performed an 358k dps run. A full 101k dps more than the Mirror Warship before her, which is a staggering increase.
In the final Part 4 of this DEW (Cannon) Series, we will look at the changes that are made on both the Mirror Constitution Warship and Vaadwaur Miracle Worker Juggernaut at the Meta Build level, to utilise the vessels in Infected Space: Elite; content that should only be undertaken with a dedicated Tank.
We will close the series with Sukobi and I giving some final analytics our reflections and conclusions.