
This is page 2 of 4. Other pages: 1, 3, 4.
Part 2 – The Moderate Investor
We now move into the second part of the series, where a player may have moved on from Free to Play and is willing to invest somewhat into the game. For this purpose we set a 10k zen limit in addition to the purchase of the Epic Starter Pack (Not Endorsed).
The 10k zen was spent on 4 CStore Ships and a 20 key bundle purchased and converted into EC by selling the keys on the exchange. This would give the player 180m in EC and this was best used towards a couple of consoles and a selection of personal traits.
We can also assume a Moderate Investor has played for long enough to upgrade their gear and even completed a meta event, where they selected lobi so that they had access to lobi gear.
Accordingly, we will give two examples below; one without lobi gear (The Gagarin) and one with lobi gear (The Temporal Vanguard Warship).
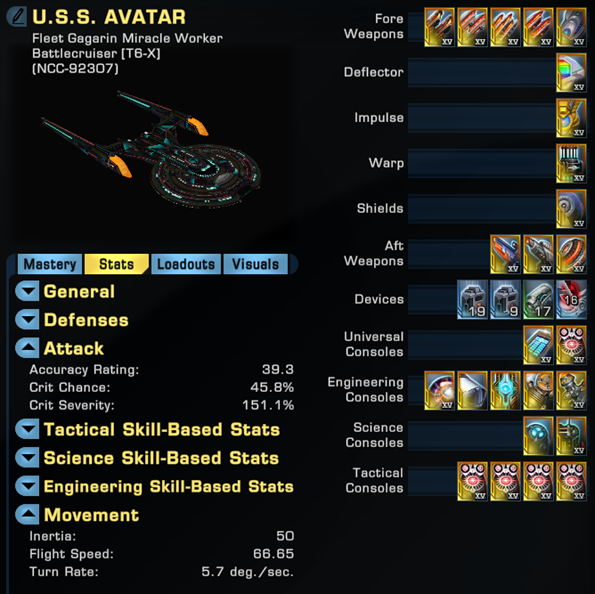
Without Lobi – T6-X Fleet Gagarin Battlecruiser
Design: Upgraded with a T6-X Token. A true Battlecruiser with an ideal 5 forward/3 rear layout. It holds a below average turn rate and a decent hull strength. With abilities, traits, rep gear and consoles now available to the Moderate Investor, any inherent weaknesses like its manoeuvrability can be compensated for in build design.
We now see a Specialist Seat in the form of a Commander Miracle Worker/Engineering. This vessel has a very attractive layout for DEW Builds, an extra universal console slot thanks to Miracle Worker and a wonderful trait (Entwined Tactical Matrices) for mixed builds, so we want to make full use of its inherent strengths in our build design.
Gear
Front: Terran Task Force Dual Heavy Cannon (Terran Rep), Crafted Wide Angle Dual Heavy Phaser Cannon, Phaser Quad Cannons (150,000 Dilithium for Sao Paulo Tactical Escort Refit), Prolonged Engagement Phaser Dual Cannon (Phoenix Store), Dark Matter Quantum Torpedo (Discovery Rep).
Rear: Advanced Inhibiting Phaser Turret (Gamma Rep), Trilithium Phaser Turret (Mission – Beyond the Nexus), Trilithium Omni-Directional Beam Array (Mission – Beyond the Nexus)
So we now see the Quantum Phase Cannons and Crafted Dual Heavy Cannons being replaced for better rep gear and gear that, whilst available in game, is harder to obtain. In turn, we see the use of an omni-directional beam array enter the build as a proc for a Miracle Worker Ability we will discuss shortly. So we are tailoring our build now based upon availability and inherent strengths of an individual vessel.
Regarding the Quad Cannons, which cost 150,000 Dilithium — I suspect that the Crafted Phaser DHC are fundamentally equal for a newer player in ISA. The QHC do not really hit stride until ISE, however it is nice to introduce them.
DECS – Fleet Colony Deflector (Fleet), Prevailing Innervated Impulse Engines (Competitive Rep), Fleet Plasma Integrated Warp (Fleet), Tilly’s Review Pending Modified Shield (Discovery Rep).
There are numerous warp cores that are viable here, but for damage output on a cannon build, the Plasma Integrated is the best choice. If you want a little more survival, the Discovery Rep Warp Core creates a 2 pc with the shield that is excellent.
Devices – Energy Amplifier, Target Lock Amplifier, Deuterium Surplus, other of choice
It should be noted that the Temporal Negotiator and Kobayashi Maru Device should be used if available.
Consoles – Lorca’s Custom Fire Controls (Discovery Rep), Ordnance Accelerator (Gamma Rep), M6 Tactical Computer (75,000 Dilithium from Temporal Escort), Approaching Agony (Infinity Lockbox/Exchange), DOMINO (Epic Starter Pack – Bajoran Interceptor), Reinforced Armaments (Mission – Beyond the Nexus), Hull Image Refractors (Infinity Lockbox/Exchange), Assimilated Module (Omega Rep), Phaser Vulnerability Locators x 5 (Fleet).
The Quantum Phase Converter has fallen out of favour for more advanced consoles and likewise, the Prolonged Engagement Console is replaced as we no longer need it to form part of our Cooldown Reduction Strategy.
Bridge Officer Seating
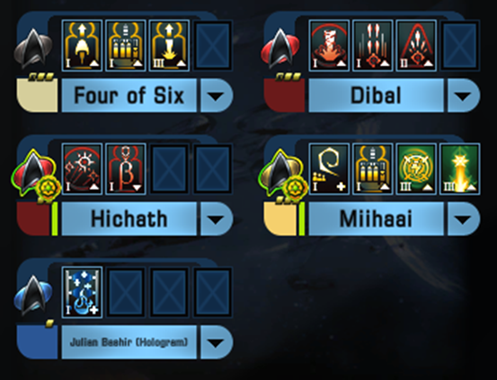
This ship would benefit from Commander Tactical, but in its current format it is very good for Beam Overload builds. It does an effective job on a cannon mixed build that we are operating. I personally would like to see the Tactical Lieutenant switched to ensign and in that scenario I would drop Cannon:Rapid Fire from the build to keep Attack Pattern: Beta. In turn, I would like the Ensign science seat to be Lieutenant Science, which would allow for Photonic Officer as part of the Cooldown Management, and so open up other options in the Engineering and Miracle Worker seating.
What we are trying to show here is how you look at a bridge officer layout and work through it like a puzzle.
As for the setup, I draw your attention to the Miracle Worker Abilities, Narrow Sensor Band III and Mixed Armament Synergy III, where one improves damage the closer you are to a target, whilst the other increases damage when an alternative weapon fires, hence the usefulness of a torpedo and omni beam array on a cannon build.
I will make a point about NSB on a Cannon: Scatter Volley Ship, which is what we are operating. The ability inherently tells you to be close to your target, but the further back you are, the more targets will be picked up in your firing arc and accordingly, as you watch the Youtube video, you will regularly see me at a range of 4-8km from a primary target, picking up more secondary targets in my arc. Keep in mind the performance of your cannons is your primary goal in your piloting.
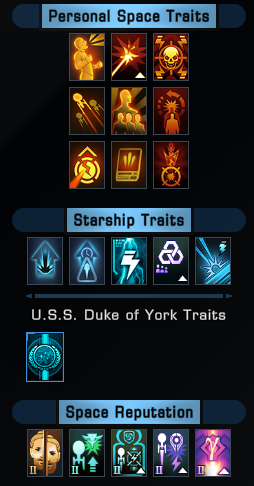
Traits
If you compare the benefits of these following traits to the free options in the defiant build above, you can clearly see the advantages that come with the investment:
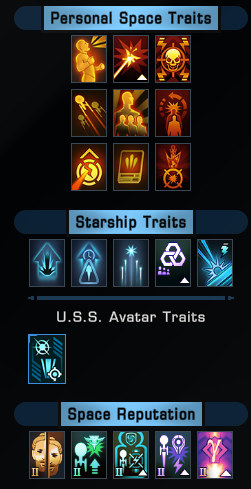
Personal Traits
A Good Day to Die: Go Down Fighting may be used at any Hull Integrity
Adaptive Offense: Gain 2.7% Critical Chance which converts 0.9% crit chance to 3% crit severity each crit per 10 seconds up to 9% critical severity
Duelist’s Fervor: When you or a teammate kills something, gain 5% all damage and +5 accuracy for 10 seconds, stacking 3 times
Fleet Coordinator: +2% Bonus (Cat2) Damage per Team Member
Inspirational Leader: 10% Chance any bridge officer ability will grant +10 to most starship skills for 15 seconds, stacking 3 times
Let me just say on Inspirational Leader – this is a huge buff – try and fathom +10 to nearly everything.
Intelligence Agent Attache: Weapon Critical Hits restore Captain Ability Recharge by 2%
Self-Modulating Fire: On critical hits, energy weapons gain 50% shield penetration for 10 seconds
Superior Cannon Training: +7.5% Bonus (Cat2) Cannon Damage
Terran Targeting Systems: 15% Crit Severity, however incoming critical hits reduce speed by 10% for 5 seconds
There are numerous personal traits and some others that get an honourable mention are Anchored, Context is for Kings, Deft Cannoneer, Fluidic Cocoon, Fragment of AI Tech, Fresh from R&R, Into the Breach, Point Blank Shot and Unconventional Systems.
Unconventional Systems is an important trait and we will be covering it in the meta-build when we speak about Infected Space: Elite. It has a particular purpose to play where consoles grant you a clicky.
Ship Traits
Emergency Weapons Cycle (Arbiter/Kurrak/Morrigu – CStore): Emergency Power to Weapons reduces Weapon Power Cost by 50% for 30 seconds and grants 20% Firing Cycle Haste for Energy Weapons for 30 seconds
This is unquestionably the first and foremost energy weapon trait that anyone flying beams or cannons should seek to acquire.
Withering Barrage: (Legendary Defiant Pilot Warship / Valiant Tactical Escort / Kor Bird-of-Prey / Legendary B’rel Bird-of-Prey / M’Chla Bird-of-Prey Refit / Legendary T’liss Light Intel Warbird / Malem Light Warbird): Extends Cannon: Scatter Volley by 4 seconds
Do not underestimate the benefit of this trait. It is essential.
Predictive Algorithms (Intel Specialisation): Removes a debuff and grants +% accuracy when activating a weapon enhancement (for 30 seconds and stacks 4 times)
Supercharged Weapons: (Endeavour Tactical Star Cruiser / Legendary Verity Command Dreadnought Cruiser / Martok Tactical Battlecruiser / Khopesh Tactical Dreadnought Warbird): Firing a Torpedo grants 1 stack of the Super Charged buff, stacking 3 times grants energy weapons 10% Damage for 20 seconds, 1.5% critical chance for 20 seconds and 6.6% critical severity for (you guessed it) 20 seconds.
Unconventional Tactics: Brace for Impact grants 15% bonus damage for 15 seconds
Entwined Tactical Matrices: (Gagarin Miracle Worker Battlecruiser / Qugh Miracle Worker Battlecruiser): When activating Torpedo: Spread it applies Fire at Will I and Scatter Volley I to self.
When activating Fire at Will or Scatter Volley it applies Torpedo: Spread I to self
In these purchases, you can see the distinct leaning toward a mixed build (Torpedo complementing Cannons). We have two starship traits that work in partnership with energy weapons to either provide additional firing mode uptime or increased damage (Cat1) and critical performance (Cat2).
Note: I am not saying that you should continue to use the free to play traits at this stage, however for the purpose of building, we set a limit for the investor. These traits (Predictive Algorithms and Unconventional Systems) can be replaced over time by a range of alternative options, but the ones that stand out include Promise of Ferocity, Strike from Shadows and Terran Goodbye.
There are also haste traits, but we will be specifically covering haste in the next build.
Space Reps
Tyler’s Duality: Crit Chance based upon Hull Capacity (Max 7.5% at 200,000 Hull Capacity)
Magnified Firepower: +6.3% (Cat2) Damage
Precision: +5% Crit Chance
Controlled Countermeasures: 9.4% (Cat2) DEW and Projectile damage against controlled targets
Advanced Targeting Systems: +20% Crit Severity
Duty Officers
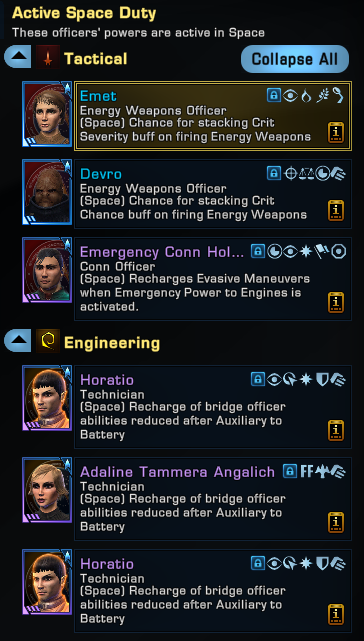
I am using a rare crit severity and critical hit pair of duty officers, but a new player can use uncommon green variants for a which may cost 250k EC.
The Emergency Conn Hologram is obtained from the Pheonix Store with a token. This duty officer allows for a resetting of Evasive Manoeuvres by clicking EPtE. This is important to travelling around the map quickly.
Finally the Cooldown Reduction method, know as Auxiliary to Battery (A2B) is in use and 3 Very Rare Technicians that recharge bridge officer abilities (10%) on use of A2B is applied. This CD Reduction also has Intelligence Agent Attaché working to reduce the CD of Captain Abilities. Together they are a highly effective and simple method.
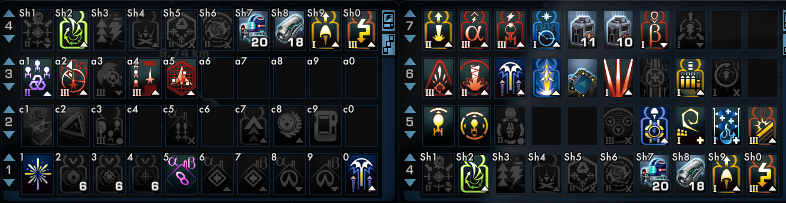
Trays
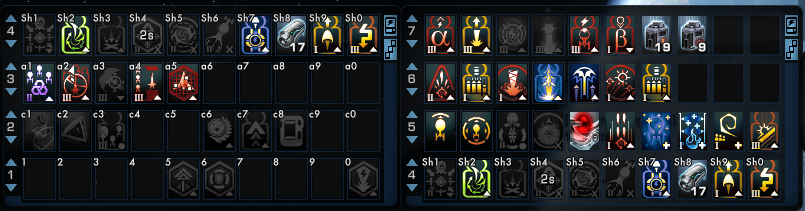
Again, in the tray section, this may look familiar to the F2P setup, and it should do. What you are however seeing is a growth in options and larger tray usage because of the introduction of console clickables and a more varied selection of abilities.
Looking at my tray above:
Tray 2 and 3 have not changed. Refer back to Part 1 – F2P if necessary.
Tray 4 has only expanded with the notable addition of Deuterium Surplus. This is obtained first by completing the “Defense Contract” daily mission, available by visiting the Alhena System in the Boreth Sector and then in your Engineering R&D. It provides an 8 second boost to flight speed and turn rate and is ideal for relocating across a TFO.
Tray 5 has only expanded too, with the clicky from Hull Image Refractors alongside Hazard Emitters and Engineering Team. Again, refer back to Part 1 – F2P if necessary.
Tray 6, the spam bar, which is bound to SPACE. Again, I remind you, no delayed activations here, but we now see the inclusion of Kemocite Laced Weaponry, our Auxiliary to Battery and our manual clickies – DOMINO and M6 Computer.
Tray 7, bound to my side mouse button, remains buffs and debuffs and holds our specialist abilities with delayed activations in the form of NSB and MAS.
Piloting and Practical Application
Let’s reiterate, how this happens in practice:
Set Engines to full power.
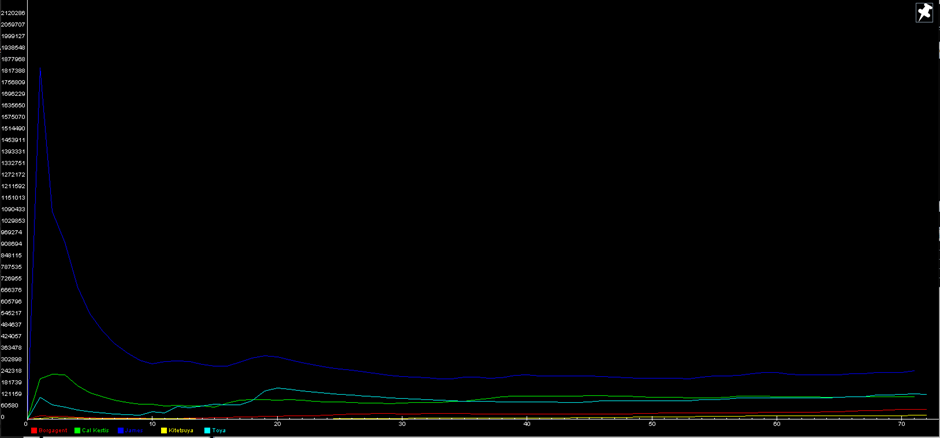
We prebuff ourselves, but note that your tray is getting longer so you should start prebuffing a full 10 seconds before combat begins; and we prebuff so that we can spike our damage output on the initial pack in an instance such as Infected Space: Advanced. This is shown below – look how only the red line has an initial jump.
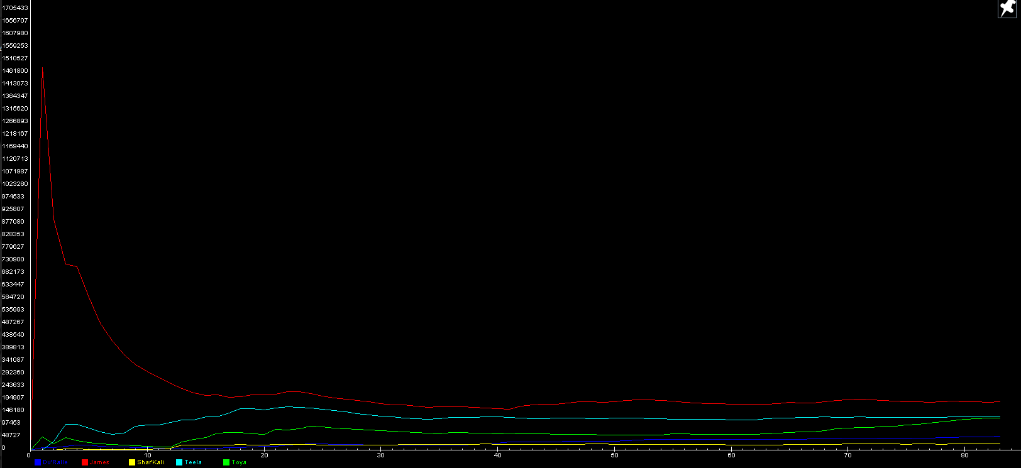
Two things are happening here:
- the others are not spiking because they are arriving to target after me, which happens because of the use of a speed boost.
- The others don’t have the damage output because they are not prebuffing. So, because of my pre-planning, I’m taking nearly all the dps available because I’m first to target and my buffed weapons hit hard and fast.
Look at it like this: If I spike 1.4m in a second, and the others only do 100k in that second, I have a 14 second head-start on them. This is why those prebuffs and the first cubes of ISA/ISE are so very important.
For the remaining process, please refer back to Part 1 – F2P.
Below is a link to an example run so that you can see the tray clicking and activations including the piloting on the Fleet Gagarin. In this run, the build performed an 185k dps run
STO – ISA – T6 Fleet Gagarin Cannon Build – 185k – YouTube
Notes
Key Components of this build are the Tactical Locator Consoles, Terran Task Force Dual Heavy Cannons, Dark Matter Quantum Torpedo, Trilithium 2Pc + Omni for MAS Proc, Cannon: Scatter Volley, Torpedo: Spread and Auxilliary to Battery; The purchased Starship Traits, our Technician (x3) and Emergency Conn Hologram Duty Officers. T6-X Upgrade Token.
With Lobi – T6-X Temporal Vanguard Warship
Design: Upgraded with a T6-X Token. Warships are manueverable, with an ideal 5 forward/3 rear layout. Their mastery is perfectly suited to progressing damage output. With abilities, traits, rep gear and consoles available to the Moderate Investor, this build also assumes the Investor has either acquired lobi or has benefitted from lobi from the meta-event (current meta event grand prize has an option for 1,500 lobi).
We also have a Specialist Seat in the form of a Commander Temporal/Tactical. This creates a choice and an opportunity on this vessel. A builder could opt for Dual Beam Banks and Recursive Shearing III (ill discuss the ability later) or Recursive Shearing I and Cannon: Scatter Volley III. Cannon: Scatter Volley II with Recursive Shearing III would be sub-optimal.
This vessel gives access to the Starship Trait, Heart of Sol (I’ll discuss this trait later).
We will be building for Cannons with an end modifier focused upon Haste so that we fire more shots per second in this build example.
Gear
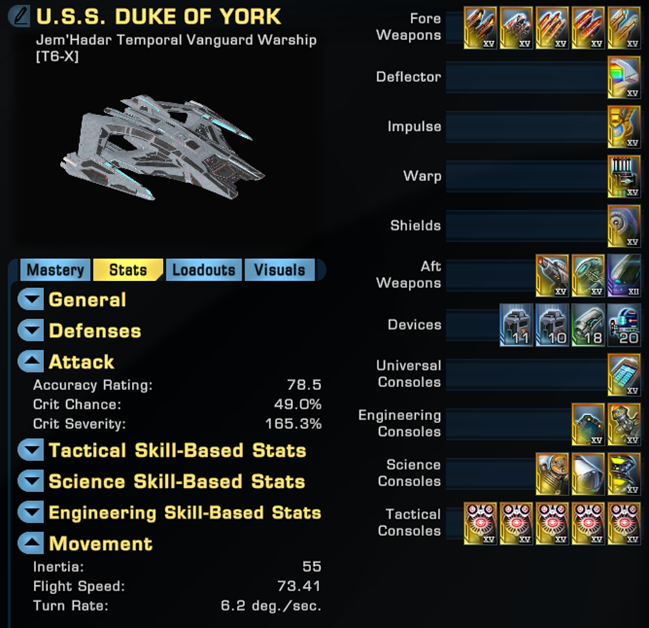
Front: Terran Task Force Dual Heavy Cannon (Terran Rep), 22.c Wide Angle Phase Cannons (Lobi Store), Phaser Quad Cannons (150,000 Dilithium for Sao Paulo Tactical Escort Refit), Prolonged Engagement Phaser Dual Cannon (Phoenix Store), Sensor-Linked Dual Heavy Phaser Cannons (Infinity Lockbox/Exchange).
Rear: Trilithium Phaser Turret (Mission – Beyond the Nexus), Altamid Modified Plasma Omni (Lobi Store), Altamid Modified Kelvin Torpedo (Lobi Store)
The 22.c Wide Angle is the best Wide Angle Phaser in the game, but it is only marginally better than any other Wide Angle Dual Heavy Phaser Cannon. If you lack lobi, this is the item that you should go without. Likewise, the Sensor-Linked Dual Heavy Cannon could easily be just a Crafted Dual Heavy Cannon.
Wait… why do we have a plasma weapon on a phaser build! It’s an Omni and this isn’t a Miracle Worker Ship!! Who puts a torpedo on the rear!!! WAIT… DON’T GO!!!!
These two are a set and coupled to the Altamid Modified Swarm Processor that you will see below, grants a 3 set bonus clicky that gives 100% Firing Cycle Haste for Weapons for 12 seconds, on a 2 minute cooldown.
Is that really worth losing two rear weapon slots for – yes, yes it absolutely is, because haste is an end modifier and we are stacking as many opportunities to have haste as we can on this build, and every build to follow, for the express purpose of accelerating the number of shots from our other 5 cannons and 1 turret. We will explain it in more detail further along as the build comes together.
DECS – Fleet Colony Deflector (Fleet), Prevailing Innervated Impulse Engines (Competitive Rep), Fleet Plasma Integrated Warp (Fleet), Tilly’s Review Pending Modified Shield (Discovery Rep).
There are numerous warp cores that are viable here, but for damage output on a cannon build, the Plasma Integrated is the best choice. If you want a little more survival, the Discovery Rep Warp Core creates a 2 pc with the shield that is excellent.
Devices – Energy Amplifier, Target Lock Amplifier, Deuterium Surplus, other of choice
It should be noted that the Temporal Negotiator and Kobayashi Maru Device should be used if available.
Consoles – Lorca’s Custom Fire Controls (Discovery Rep), Altamid Modified Swarm Processor (Lobi Store), Reinforced Armaments (Mission – Beyond the Nexus), DOMINO (Epic Starter Pack – Bajoran Interceptor), M6 Tactical Computer (75,000 Dilithium from Temporal Escort), Bio-Neural Infusion Circuits (Lobi Store), Phaser Vulnerability Locators x 5 (Fleet).
Lobi gear and the lower number of console spaces compared to Miracle Worker Vessels like the Gagarin, pushes out the Assimilated Module, Ordnance Accelerator, Hull Image Refractors and Approaching Agony.
Bridge Officer Seating
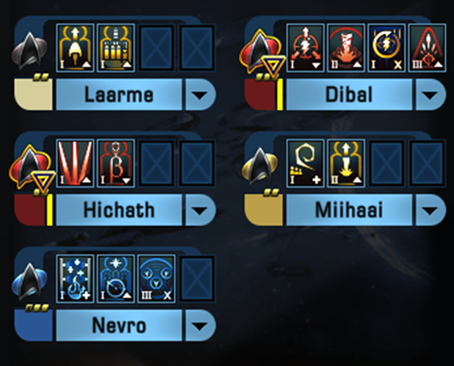
I mentioned previously that this ship has a choice to make. It is perfectly suited to Dual Beam Banks and Recursive Shearing III because Recursive Shearing III would take the Commander slot and Beam: Overload III would take the Lieutenant Commander slot.
Why is RSIII important? It targets a foe and for 5 seconds, the amount of hull depleted from the target is stored and then it deals Physical Damage equal to 30% of the stored value (Ignores Shields and Resistances). This however is better in Elite content than advanced, because if the target dies before 5 seconds, no damage is dealt. As such, for ISA, it can have a risk to its use, but in turn is one of the best abilities in the game and can deal massive damage.
We however are focussed on our Cannons, and so a compromise must be made of Recursive Shearing I and Cannon: Scatter Volley III. Cannon: Scatter Volley II with Recursive Shearing III would be sub-optimal; and as we have said above, for ISA RSIII may not see it’s full potential being realised.
The vessel has a Universal Lieutenant slot and we have applied Engineering to this. As such, we have blend our Science and Engineering to make a Cooldown Reduction Technique known as Half Batt – One Auxiliary to Battery I is complemented by Photonic Officer I and the same 3 Technicians that we are familiar with.
Distributed Targeting has been used as an ensign tactical filler chaining 16.8% of incoming damage (50% Shield Penetration) to up to 3 foes in a 3km radius of the primary target.
You will also note a new science ability in the Lieutenant Commander slot. This is Delayed Overload Cascade III and should be used with great care, or replaced with alternative abilities. The reason for this is that the ability should be considered an executioner move as when activated, the target and up to 7 other foes within a 2 km radius will after 1 second receive significant Kinetic Damage, but if not killed, will be propelled 8-10 km away. This can be devastating to a run, so use with care.
Traits
If you compare the benefits of these following traits to the free options in the defiant build above, you can clearly see the advantages that come with the investment:
Personal Traits
These remain unchanged on this build, from the Gagarin. Please refer to the Gagarin for more details.
Ship Traits
Emergency Weapons Cycle (Arbiter/Kurrak/Morrigu – CStore): Emergency Power to Weapons reduces Weapon Power Cost by 50% for 30 seconds and grants 20% Firing Cycle Haste for Energy Weapons for 30 seconds
Withering Barrage: (Legendary Defiant Pilot Warship / Valiant Tactical Escort / Kor Bird-of-Prey / Legendary B’rel Bird-of-Prey / M’Chla Bird-of-Prey Refit / Legendary T’liss Light Intel Warbird / Malem Light Warbird): Extends Cannon: Scatter Volley by 4 seconds
Calm Before the Storm: (Cardassian Ghemor Intel Flight Deck Carrier) This vessel also grants access to Spiral Wave Disruptors so a great purchase: While in Combat, Gain 1 Calm stack every 2 seconds. Each stack of Calm gives +5 All Damage Resistance Rating. At 10 stacks gain Storm for 20 seconds, granting 33% Firing Cycle Haste for Energy Weapons and Bridge Officer abilities recharge 33% faster
Predictive Algorithms (Intel Specialisation): Removes a debuff and grants +% accuracy when activating a weapon enhancement (for 30 seconds and stacks 4 times)
Unconventional Tactics: Brace for Impact grants 15% bonus damage for 15 seconds
Heart of Sol (Note: each Faction has a different name for this trait): (Edison-class Temporal Warship / Jem’Hadar Vanguard Temporal Warship / Kholhr-class Temporal Warbird): Attack Pattern Beta or any Temporal Operative Bridge Officer ability grants 10% Firing Cycle Haste for Energy Weapons for 20 seconds and 5% (CAT2) Phaser Damage for 20 seconds
Let’s now put the pieces of this build together and discuss Haste.
- Trilithium 2 Pc – +5% Firing Cycle Haste for Energy Weapons
- Altamid 3 Pc – 100% Firing Cycle Haste for Weapons for 12 seconds
- DOMINO – 25% Firing Cycle Haste for Energy Weapons for 10 seconds extending +2 seconds for each foe defeated up to 20 seconds (30 seconds total)
- M6 Tactical Computer – 20% Firing Cycle Haste for All Weapons for 15 seconds
- Emergency Weapons Cycle – 20% Firing Cycle Haste for Energy Weapons for 30 seconds
- Calm Before the Storm – 33% Firing Cycle Haste for Energy Weapons for 20 seconds
- Heart of Sol – 10% Firing Cycle Haste for Energy Weapons for 20 seconds
The build has a clear focus, it is not, seeking some damage, some crit, some recharge. It is stacking an end modifier that regardless of Damage or Crit, is taking the inherent Damage and Crit in the build and multiplying it, through more hits per second equating to more damage per second and as a result, because we are prebuffing, many of these are being stacked and activated to deliver incredible damage in the first phase of combat. We can put that into numbers: The Gagarin, which was not stacking Haste to the degree that the JHV Temporal Warship has had a comparable Attacks per Second on the Energy Weapons of 8.7ps vs 11.1ps.
Duty Officers
Duty Officers are unchanged. Refer to the Gagarin for more information.
Trays
Not much is now changing from build to build. They follow the same pattern, with slight tweaks dependent upon the abilities and consoles that are in use. There is the same growth in tray size through the introduction of console clickables and a more varied selection of abilities. In turn, as noted, this means your prebuff cycle needs to start a full 10 seconds before combat begins.
Looking at my tray above:
Tray 6, the spam bar, which is bound to SPACE. Again, I remind you, no delayed activations here, but we now see the inclusion of Kemocite Laced Weaponry, our Auxiliary to Battery and our manual clickies – M6 Computer, DOMINO and Altamid Console. Recursive Shearing also slips to the end.
Tray 7, bound to my side mouse button, remains buffs and debuffs with delayed activations, but also note that Photonic Officer is here too as it again has a delayed activation and I remind you, delayed activations interrupt firing cycles.
Piloting and Practical Application
Let’s again go through how this happens in practice:
Set Engines to full power.
We prebuff ourselves, but note that your tray is longer so you should start prebuffing trays 3, then 7, starting a full 10 seconds before combat begins; and we prebuff so that we can spike our damage output on the initial pack in an instance such as Infected Space: Advanced. This is shown below – look how only the blue line has an initial jump. For the run undertaken in the Temporal Vanguard Warship, this spike reaches 1.8m dps; a full 400k more than the Gagarin did.
The same principles apply as noted on the Gagarin build and again, please refer back to Part 1 – F2P for the remaining cycle and process.
Below is a link to an example run so that you can see the tray clicking and activations including the piloting on the Temporal Vanguard Warship. In this run, the build performed an 249k dps run.
STO – ISA – T6 Temporal Vanguard Warship – 249k – YouTube
Notes
The build is the sum of its parts; its traits, its cannons, its consoles, its tray layout and how the vessel is piloted are all contributing to the vessel’s performance. However, I mentioned a theme, which was running haste through the build, which I would say is now the key component of this build.
However, it can be taken forward and in the next part, we will incorporate lockbox ships and their parts, before finally looking at the undisputed peak Cannon vessel in Star Trek Online.