
This is page 4 of 4. Other pages: 1, 2, 3.
Part 4 – The Meta-Builder for Elite Content
As we begin our final Part of this series, we take the vessels used in Part 3 and rework their builds specifically for Elite Content, such as ISE, we will then conclude the series with some analytics from Sukobi before a reflection from me and our conclusions.
The reason Elite content is so very different is because, as you would expect, everything is scaled up in the TFO. The foes hit harder, have higher health and are often in more quantities. This means that Elite TFOs can’t be ‘pugged’, requiring a team to form with dedicated roles <Tank / Control / EPG / DPS>. In turn, the runs take longer than Advanced and cannot be overwhelmed by one player as you saw the vessels do in Parts 2 and 3. It is truly a team effort and accordingly, we build to meet the requirements of the Elite Content.
This tends to mean that because we have a Tank, damage reduction and healing capabilities are disgarded to allow DPS potential to grow, whilst Cooldown Reduction Management reverts back to some of the models we saw in Part 2 – we see the return of Half Batt and A2B to Elite Builds to address the sustained CD Management of longer runs.
Lockbox – T6-X Mirror Constitution Warship – Build for ISE
Gear
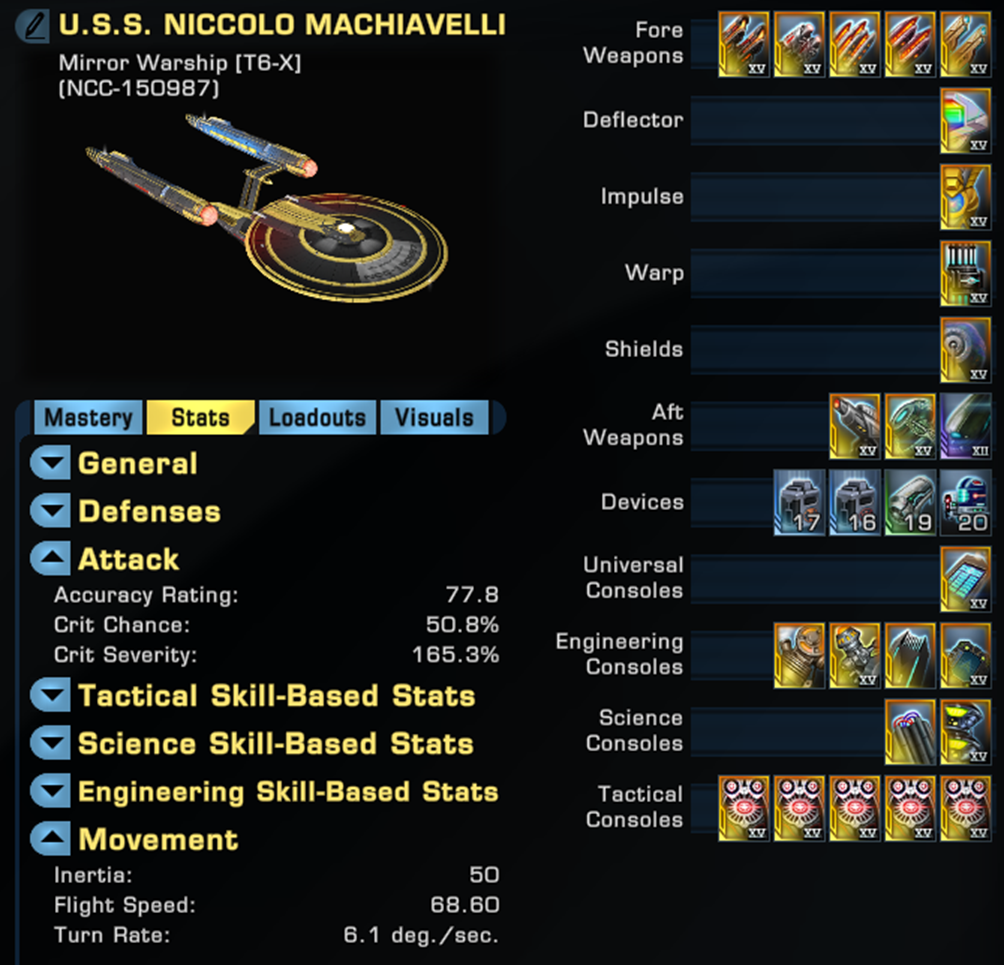
No change to Weapons and DECS – these remain the optimal choices for damage output.
Front: Terran Task Force Dual Heavy Cannon (Terran Rep), 22.c Wide Angle Phase Cannons (Lobi Store), Phaser Quad Cannons (150,000 Dilithium for Sao Paulo Tactical Escort Refit), Prolonged Engagement Phaser Dual Cannon (Phoenix Store), Sensor-Linked Dual Heavy Phaser Cannons (Infinity Lockbox/Exchange).
Rear: Trilithium Phaser Turret (Mission – Beyond the Nexus), Altamid Modified Plasma Omni (Lobi Store), Altamid Modified Kelvin Torpedo (Lobi Store)
DECS – Fleet Colony Deflector (Fleet), Prevailing Innervated Impulse Engines (Competitive Rep), Fleet Plasma Integrated Warp (Fleet), Tilly’s Review Pending Modified Shield (Discovery Rep).
Devices – Energy Amplifier, Target Lock Amplifier, Deuterium Surplus, Kobayashi Maru Device
Consoles – Lorca’s Custom Fire Controls (Discovery Rep), Altamid Modified Swarm Processor (Lobi Store), Reinforced Armaments (Mission – Beyond the Nexus), DOMINO (Epic Starter Pack – Bajoran Interceptor), Immolating Phaser Lance (Deimos Pilot Destroyer – Lockbox/Exchange), Dynamic Power Redistributor Module (Atlas Prototype Dreadnought Cruiser – Lockbox/Exchange), Bio-Neural Infusion Circuits (Lobi Store), Phaser Vulnerability Locators x 5 (Fleet).
The only change is that we sacrifice the M6 Tactical Computer for the Immolating Phaser Lance from a Lockbox ship.
The Immolating Phaser Lance gives 15.8% (Cat1) Phaser Damage and 43.8 Shield Penetration. The clicky fires a beam, dealing 16,400 Phaser Damage every 5 seconds. The lance has 6 charges and charges are replenished every 20 seconds. I can’t under emphasise just how powerful this console is – it is like having another weapon.
I chose only to use it in Elite Content because in the short runs of Advanced Content, the M6 Tactical Computer is more effective, whilst in the longer runs of Elite Content, the shear damage output of the console over time is unrivalled.
The output of this console is shown below, sitting 6th, directly behind the front Cannons and equal to the Rear Trilithium Turret.

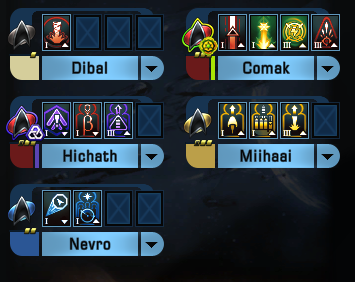
Bridge Officer Seating
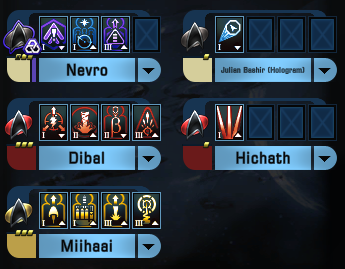
Our changes to our stations are two-fold.
- We must now account for Cooldown Management. We do this by dropping the filler – Let is Go II and adopting Auxiliary to Battery I in the Lieutenant Engineeering seat.
- We need to provide the control abilities that will proc Unconventional Systems in our personal traits. In the Intel Ensign seat, we adopt Viral Impulse Burst I; in the Universal Ensign Seat we adopt Tractor Beam I.
Photonic Officer I remains in the Universal Lieutenant Slot as part of our Half Batt Cooldown Reduction Strategy.
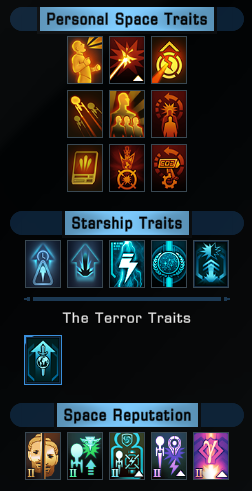
Traits
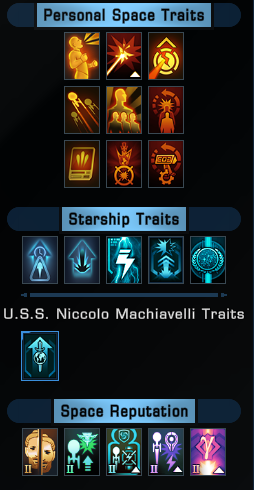
Only two changes are made in our traits, but both are significant.
The personal trait ‘Dualist’s Fervor’ is dropped in place of ‘Unconventional Systems’
Unconventional Systems reduces the cooldown of most Universal Consoles with a cooldown of more than one minute, to a minimum cap of one minute, by using a Control Bridge Officer Ability. What this means is that we have the potential to reduce our console clickies to be used as much as once per minute, which is very useful on a 2> minute ISE run.
Secondly, as on the Temporal Vanguard Warship, we bring back ‘Calm Before the Storm’ and swap out ‘The Ruin of our Enemies’. Again, as ISE is a longer instance, there is time available for Calm to be more effective, it adds a limited amount of damage resistance and stacks additional haste that we sacrificed previously. Ruin falls out of favour because we are now in competition with other high performing DPSers and there is less certainty that we will hold the lion’s share of kills that was available to us. Finally, we no longer need Ruin to form part of our Cooldown Reduction Management.
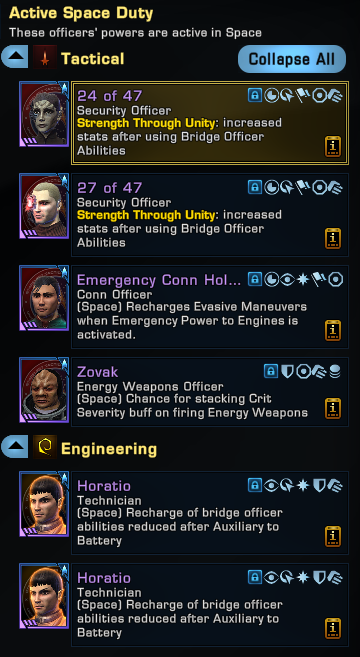
Duty Officers
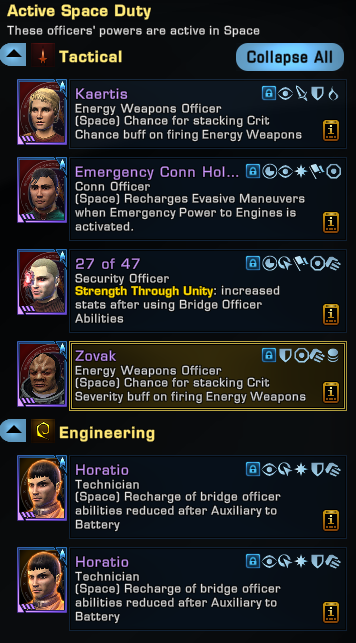
As the final piece of our Cooldown Reduction Strategy, we bring in 2 Very Rare Technicians. You are often advised to have 3, but with 3 points in Tactical Readiness and the use of Tactical Initiative, Photonic Officer I and an Auxiliary 2 Battery I, the two Technicians will hold themselves just fine.
It is worth saying, the idea of 3 Technicians on an A2B or Half Batt solution is like filling a bottle of water under the Angel Falls – you’ll get a full bottle, but there is quite a bit of overspill.
For this, we drop Dylrene as the 10% (Cat1) damage against Borg is a fairly small boost anyway. We also lose 42 of 47, which was part of the Mirror Warship’s Cooldown Strategy in ISA.
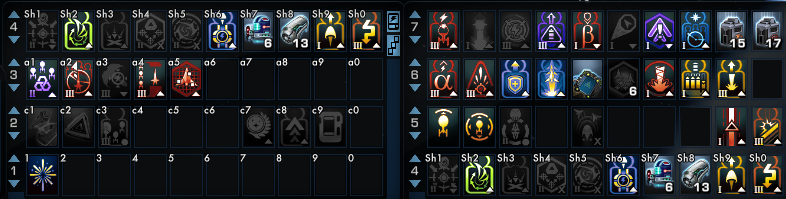
Trays and Activations
The tray is unchanged now and you can refer back to Part 2 – Moderate Investor for more information, but this should now be bread and butter to you. Simply lift this methodology onto any DEW vessel you build moving forward.
Likewise, buffing, activations and piloting should all reflect what we have covered previously. Keep in mind, it takes 10 seconds to work through our Prebuff Cycle and click Evasive Manoeuvres.
The difference with combat now is that you are in the instance for longer as a result of its increased difficulty. This makes it important to keep an eye on EPtE so that you can click it to reset your Evasive Manoeuvres, which is essential to traversing the map. Keep in mind on this point that EPtW is in the first slot of Tray 7, so if you miss the opportunity to click EPtE, you may find that it is on cooldown when you need it as it shares a cooldown with EPtW.
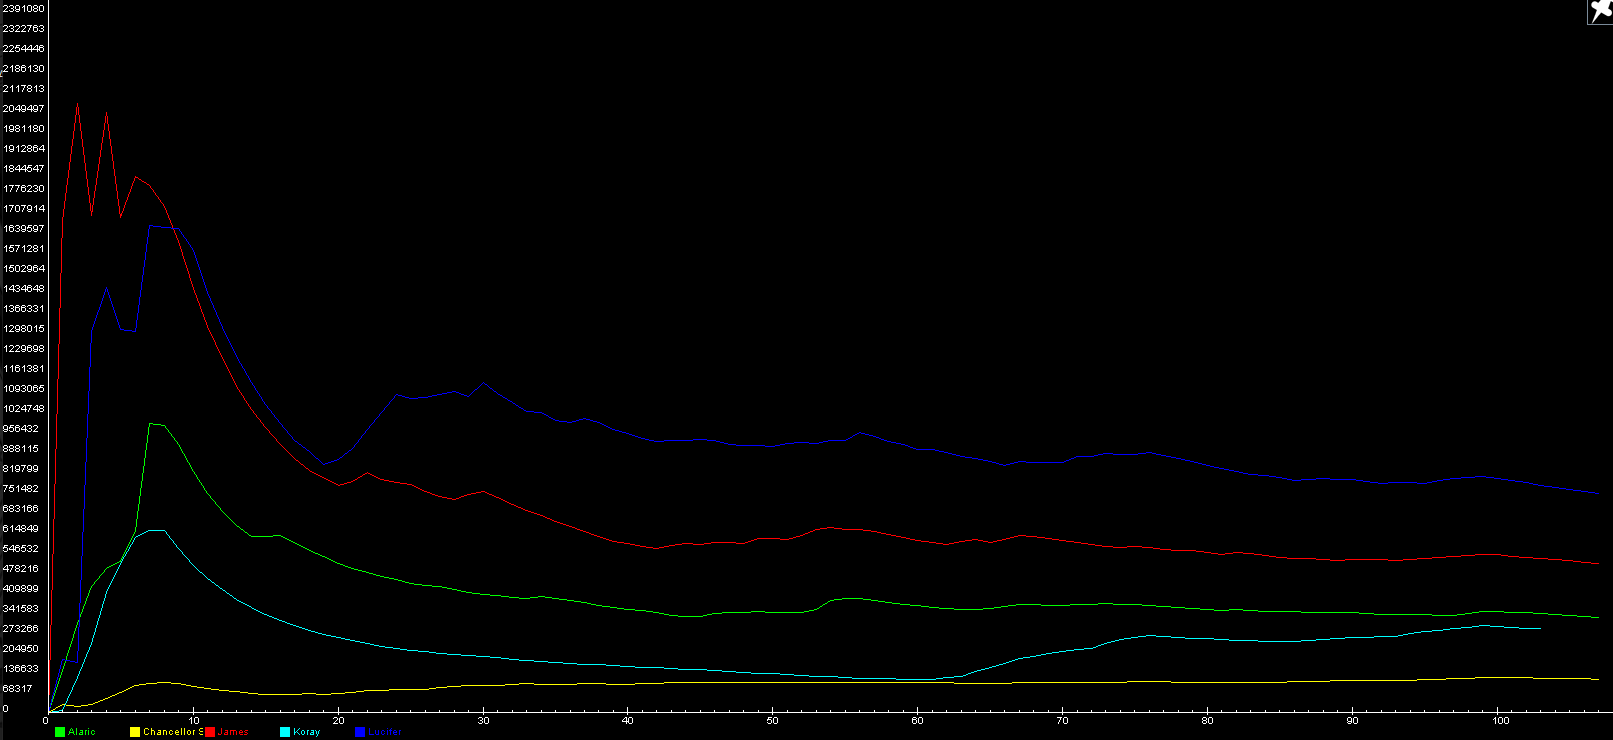
As we are used to now, we prebuff so that we can spike our damage output on the initial pack in the Instance and this principle is the same for Elite, as with Advanced. This time, see how the blue line spikes twice. This is because the first pack takes longer to kill in ISE and the cannons fire in bursts, so we rise and fall and rise and fall during that initial engagement. For this run undertaken in the Mirror Constitution Warship, this spike reaches 2.4m dps and respikes to 2.2m dps.
Below is a link to this run so that you can see the tray clicking and activations including the piloting, especially how it differs to ISA, carried out on the Mirror Constitution Warship. In this run, the build performed an 604k dps run.
STO – ISE – T6 Mirror Warship – 604k – YouTube
Promo Box – T6-X Vaadwaur Miracle Worker Juggernaut – Build for ISE
Gear
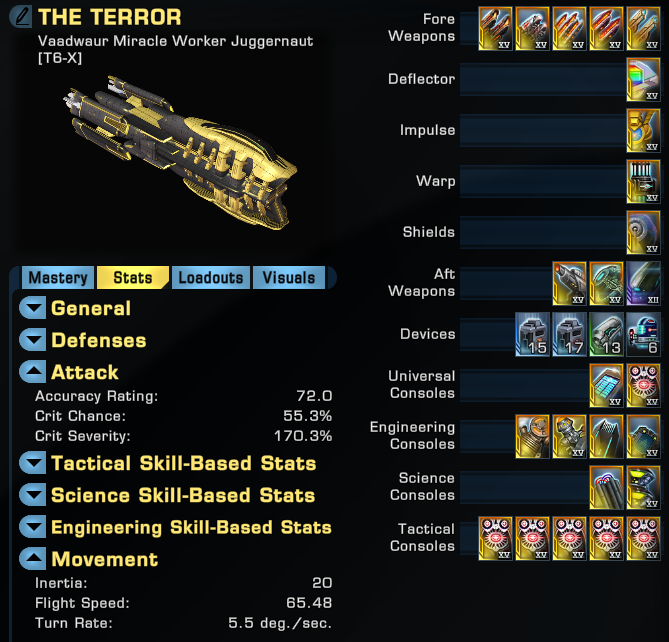
No change to Weapons and DECS – these remain the optimal choices for damage output.
Front: Terran Task Force Dual Heavy Cannon (Terran Rep), 22.c Wide Angle Phase Cannons (Lobi Store), Phaser Quad Cannons (150,000 Dilithium for Sao Paulo Tactical Escort Refit), Prolonged Engagement Phaser Dual Cannon (Phoenix Store), Sensor-Linked Dual Heavy Phaser Cannons (Infinity Lockbox/Exchange).
Rear: Trilithium Phaser Turret (Mission – Beyond the Nexus), Altamid Modified Plasma Omni (Lobi Store), Altamid Modified Kelvin Torpedo (Lobi Store)
DECS – Fleet Colony Deflector (Fleet), Prevailing Innervated Impulse Engines (Competitive Rep), Fleet Plasma Integrated Warp (Fleet), Tilly’s Review Pending Modified Shield (Discovery Rep).
Devices – Energy Amplifier, Target Lock Amplifier, Deuterium Surplus, Kobayashi Maru Device
Consoles – Lorca’s Custom Fire Controls (Discovery Rep), Altamid Modified Swarm Processor (Lobi Store), Reinforced Armaments (Mission – Beyond the Nexus), DOMINO (Epic Starter Pack – Bajoran Interceptor), Immolating Phaser Lance (Deimos Pilot Destroyer – Lockbox/Exchange), Dynamic Power Redistributor Module (Atlas Prototype Dreadnought Cruiser – Lockbox/Exchange), Bio-Neural Infusion Circuits (Lobi Store), Phaser Vulnerability Locators x 6 (Fleet).
Once again, we only swap out the M6 Tactical Computer for the Immolating Phaser Lance, acquired from the Deimos.
Bridge Officer Seating
Station changes are as per the Mirror Constitution Warship, for the same reasons.
Traits
Trait changes are the same as the Mirror Constitution Warship and for the same reasons.
Duty Officers
Duty Officer Changes are as per the Mirror Constitution Warship, except instead of 42 of 47, 39 of 47 is dropped.
Trays and Activations
Tray and activations are as per the Mirror Constitution Warship.
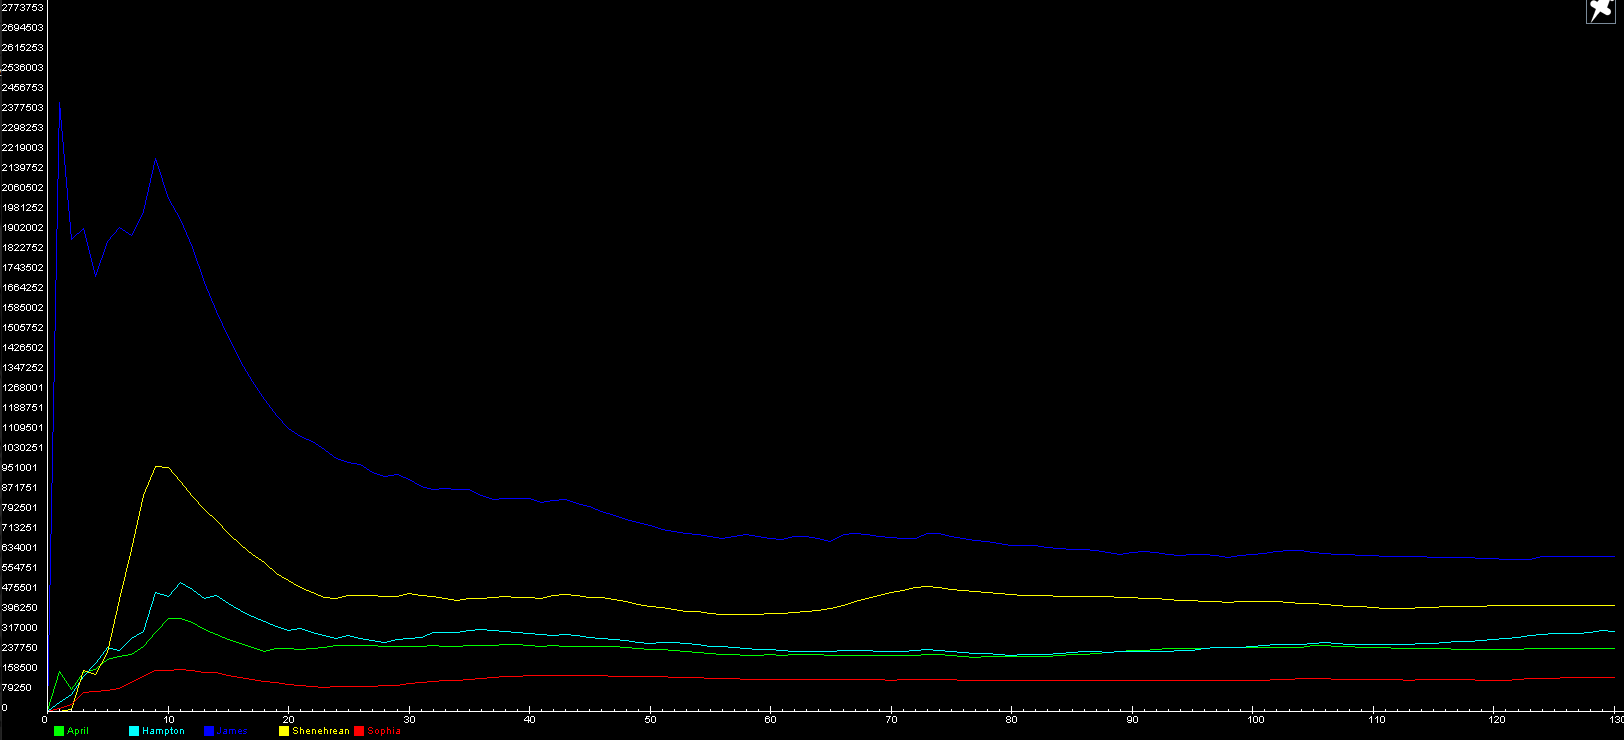
Now, to the combat, you can see how I share the DPS battle with another DPSer (My line is Red and the other is Blue). In this instance, we had a guest appearance from none other than STO’s top Streamer, Augmented Dictator Games, on his toon Lucifer@Darkspeaker. ADG holds the spot of the second highest DPSer in the game, so it was great to have him in the run with me, but this did mean sharing the DPS against his Torpedo Build, which are the undisputed highest parsing builds in Star Trek Online.
Despite ADG’s overall stronger run (737k) to the Juggernaut’s (500k) you see the Juggernaut spikes higher. This is because I hit the Cubes from the front, whilst ADG continues past the targets and swings around to gain flanking damage from the rear on his Temer. This costs him significant time in the DPS race and allows me an early opportunity to capitalise, but ultimately, a DEW Build is no match for a Meta Torpedo Build.
Regardless, as we share the DPS, the Vaadwaur Miracle Worker Juggernaut spikes to 2m dps.
Below is a link to this run so that you can see the tray clicking and activations including the piloting, especially how it differs to ISA, carried out on the Vaadwaur Miracle Worker Juggernaut, performing a 500k dps run.
STO – ISE – T6 Vaadwaur Juggernaut – 500k – YouTube
I can’t leave the undisputed DEW vessel of STO on a 500k run can I? What an anti-climax to the Series!
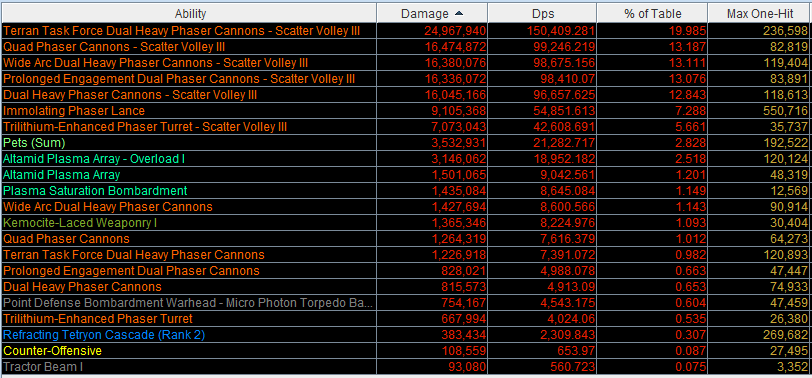
Whilst unrecorded, below is the parse for my personal record and also the 44th Fleet’s current highest parse of 752k dps.
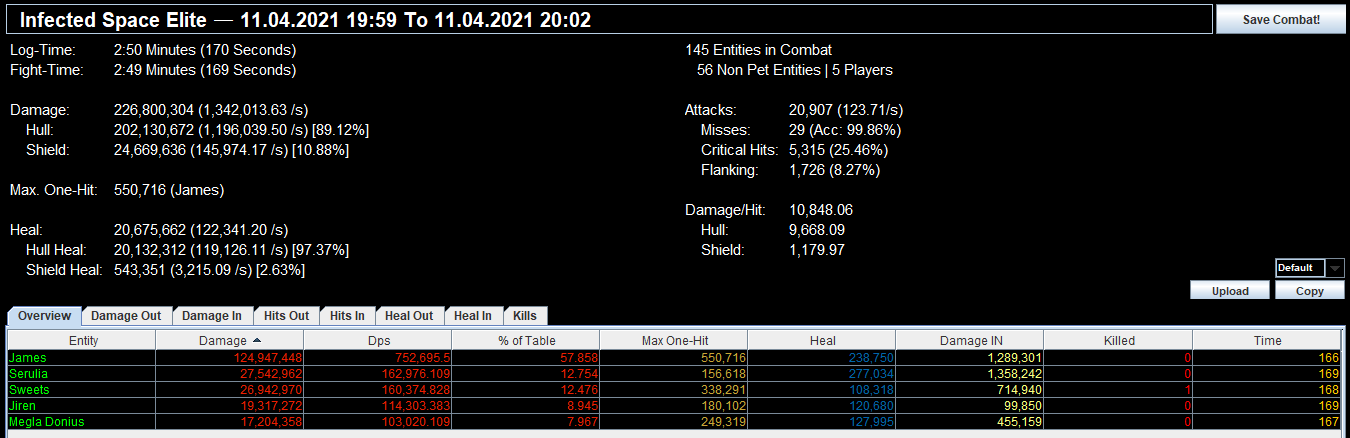
Here you can see how the weapons performed:
Sukobi’s Analysis
There are five ships in this comparison series; first we’ll discuss their differences so that the guides can be evaluated in terms of the ship’s capabilities.
The T4 Defiant is a minimal tactical ship — containing the core of the build. There’s not much to compare here (all the other ships add more) — but this ship has much higher mobility (much higher turn, higher impulse, better inertia) which helps it position for intel flanking.
The Fleet Shephard/Gagarin, Fleet JHV Temporal Warship, Mirror Constitution Warship and Vaadwaur Miracle Worker Juggernaut are all similar peak tactical ships: 5/3 weapons with 5 tactical consoles. The two warships run almost the same mobility, while the Gagarin is sluggish-but-reasonable, and the Juggernaut is supposed to be a slow beast [offset by Competitive engines].
The main differences in these four T6 ships are the bridge officer layouts — plus an extra tac console for the Miracle Worker in the Juggernaut and Gagarin. This alters the damage output and timing on each ship, with Miracle Worker being the strongest boost.
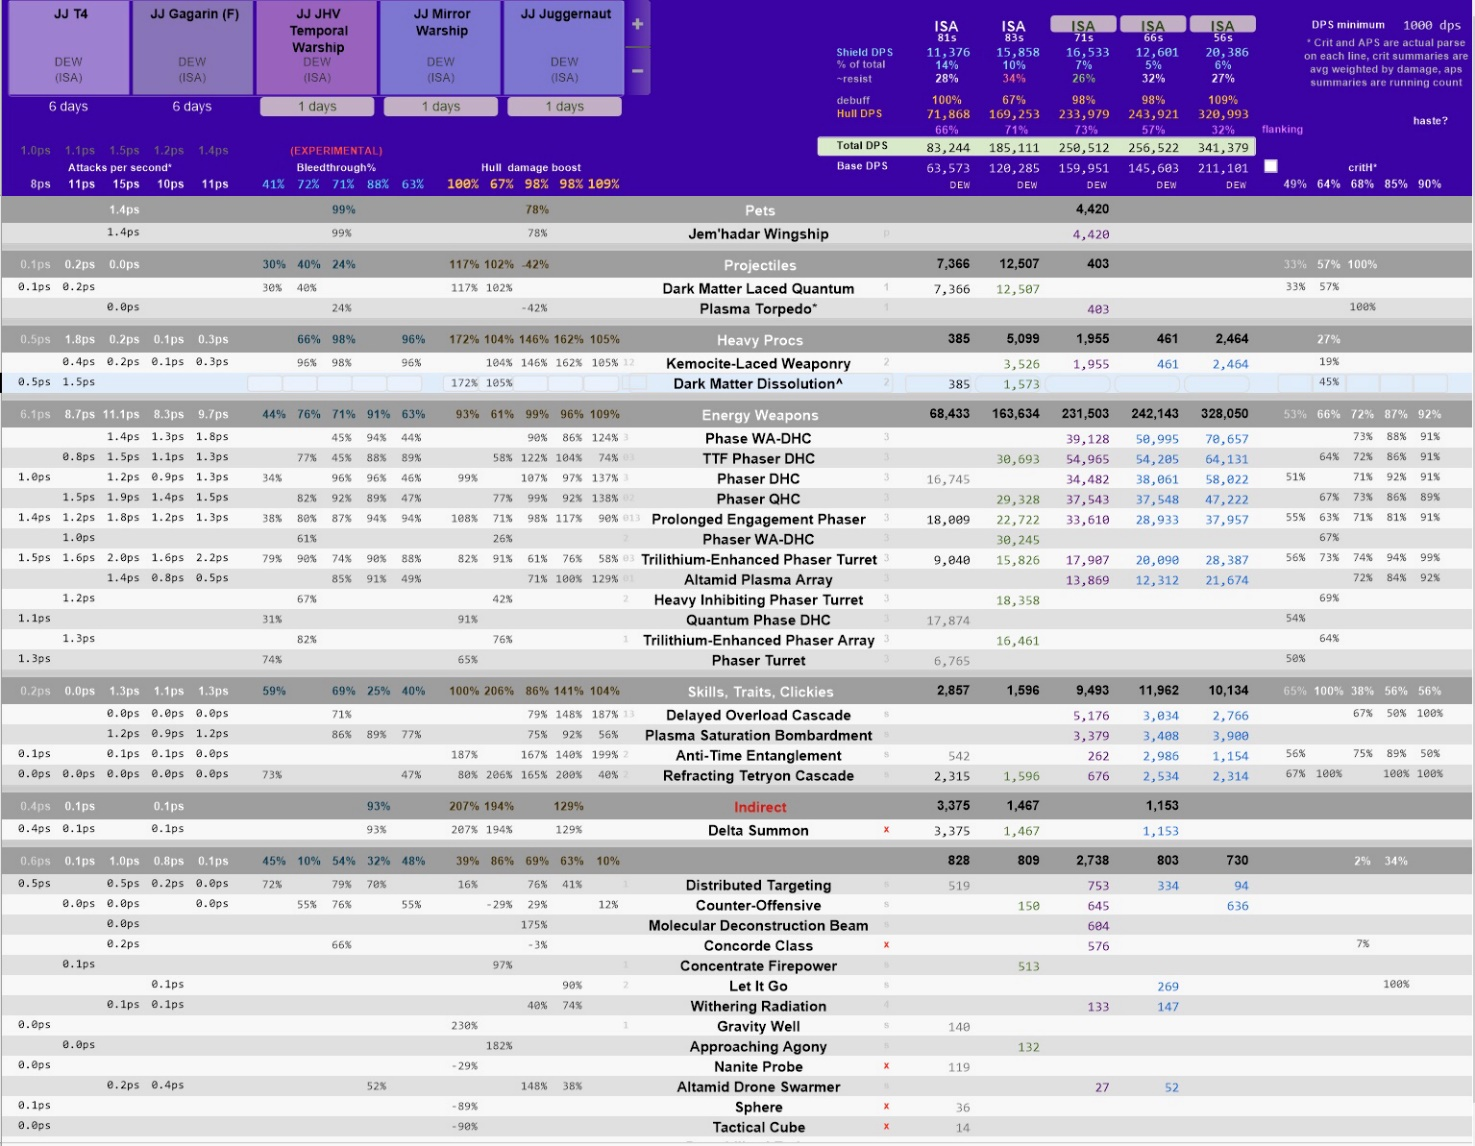
How to read damage:
“Base DPS” is the amount of dps that leaves the weapons themselves — this does not include debuffs on the target or flanking. This is an indicator of the core output of the build, but not the flight style or skill/cast usage.
“Total DPS” is the amount of dps that lands on targets — this includes all resists or debuffs and indicates the actual performance in that map run.
Base DPS is a better measure for build performance, while Total DPS [the standard DPS number] is better for identifying the performance in the actual map (with those team-mates, with that flying pattern, etc). This series has been chosen for highly consistent flight results, but you’ll see variations in flanking and debuff rates that affect the Total DPS significantly.
ISA vs ISE
Combat is quite different between the two, with ISE favoring DOTs and shield disabling/dmg much more — but the main rise in dps potential is just the fact that there are many more targets with a lot more hull to shoot. ISA has peak output numbers much lower, so the dps counts are not directly comparable.
ISA – 1torp vs no-torp
This is not a study in the value of 1torp, but more of a quick example of how 1torp falls behind without additional uses (Entwined Tactical Matrices, Super-Charged Weapons, etc). We can see that the torpedo does not keep up with the DHC increases in this gear focus. Most of this is because of the stacking of Tactical Locator consoles for the primary energy damage [rather than kinetic] — but the difference is fairly extreme. As the energy weapon output gets higher, the value of using SCW/ETM also increases, but that’s a different series for a later date.
ISA – Gear slots vs DPS
Gear ratings (amount of configurable gear slots and the power of what can go in them) put the T4 defiant at 28%, with both warships and the Gagarin in the 82% range, and the Juggernaut riding at 95% [100% is the ‘most configurable in the game currently’ — so these are all relative to current options].
A small bit of math: The T4 has 1/3rd of the options of the T6 Gagarin, but with the same core build, manages 1/2 of the dps. This shows off something important: The first parts of your build are the strongest — what you fill in with and tune has an effect, but less. This series should show the core parts of that energy build.
The Gagarin is an intermediate build in this series — but if it was setup with the more expensive gear set on the higher end ships, it would easily be competitive — it is mostly limited by the lack of a Tactical Commander seat for Cannon: Scatter Volley III.
ISA – individual weapon performance
- Note that weapon order matters — the left most weapon gets the most power and the first firing. The right-most weapon gets the least power and the last firing. [assuming no manual auto-fire orders chosen]
- TTF DHC: The beast. This one quite frequently leads the individual weapon charts, and has particularly good effect; finishing off medium ships or wearing down boss-level ships. It can fall behind the wide-angle DHC just due to targeting arcs, but is rarely bested by any other kind of DHC.
- Wide-angle DHC: A convenient addition, the wide angle on this really helps CSV output and offsets a few target arc errors or timing.
- Phaser Quad Cannons: Somewhat fickle weapons, they’re capable of stronger-than-average output, but tend to require a lot of targets or high hull targets as they’re prone to torpedo-like overkill [which becomes lost dps]. Generally better in ISE.
- Prolonged DHC: Weakened slightly at first burst, this weapon rises in output the longer you are in combat. This doesn’t show as well in fast ISA/ISE combats, but nearly always rises up to strong performances with longer combat times. Can be easily swapped out for a normal or alternate feature DHC.
- Quantum Phase DHC: An odd one, this should help take out shields a bit faster. The DHC itself is not quite as ideal, and often falls out of favor in end-game build tuning. The torpedo is far better at the shield game than the DHC.
- Phaser DHC [base / crafted]: As the build improves, these scale up quite nicely. They tend to be placed in the lower power slots due to the lack of extra power, so their slightly lower output is at least partially attributable to that.
- Turrets: Strong output on a CSV boat, these can reach up into the lower-DHC damage tiers. Which ones you use tends to be based on set/features.
- Omnis: An odd part of a cannon build — these are used to proc Mixed Armaments Synergies (+Bonus dmg) on Miracle Worker ships, as well as a variety of other needs to toss a beam out. The Altamid 3pc has been a consistently strong performer, and necessitates the extra Omni as well. The damage you lose over running another turret is most easily offset by the gains from the 3pc.
ISA – non-weapon output
Pretty much nothing else impacts in ISA. Skills like Kemocite Laced Weaponry or Delayed Overload Cascade add some elements to the performance of the weapons themselves, but make very little direct impact in the ISA space. Cannons fire so fast and strong that there is little time for anything else to take effect. [This includes the attacks of other kinds of builds sometimes!]
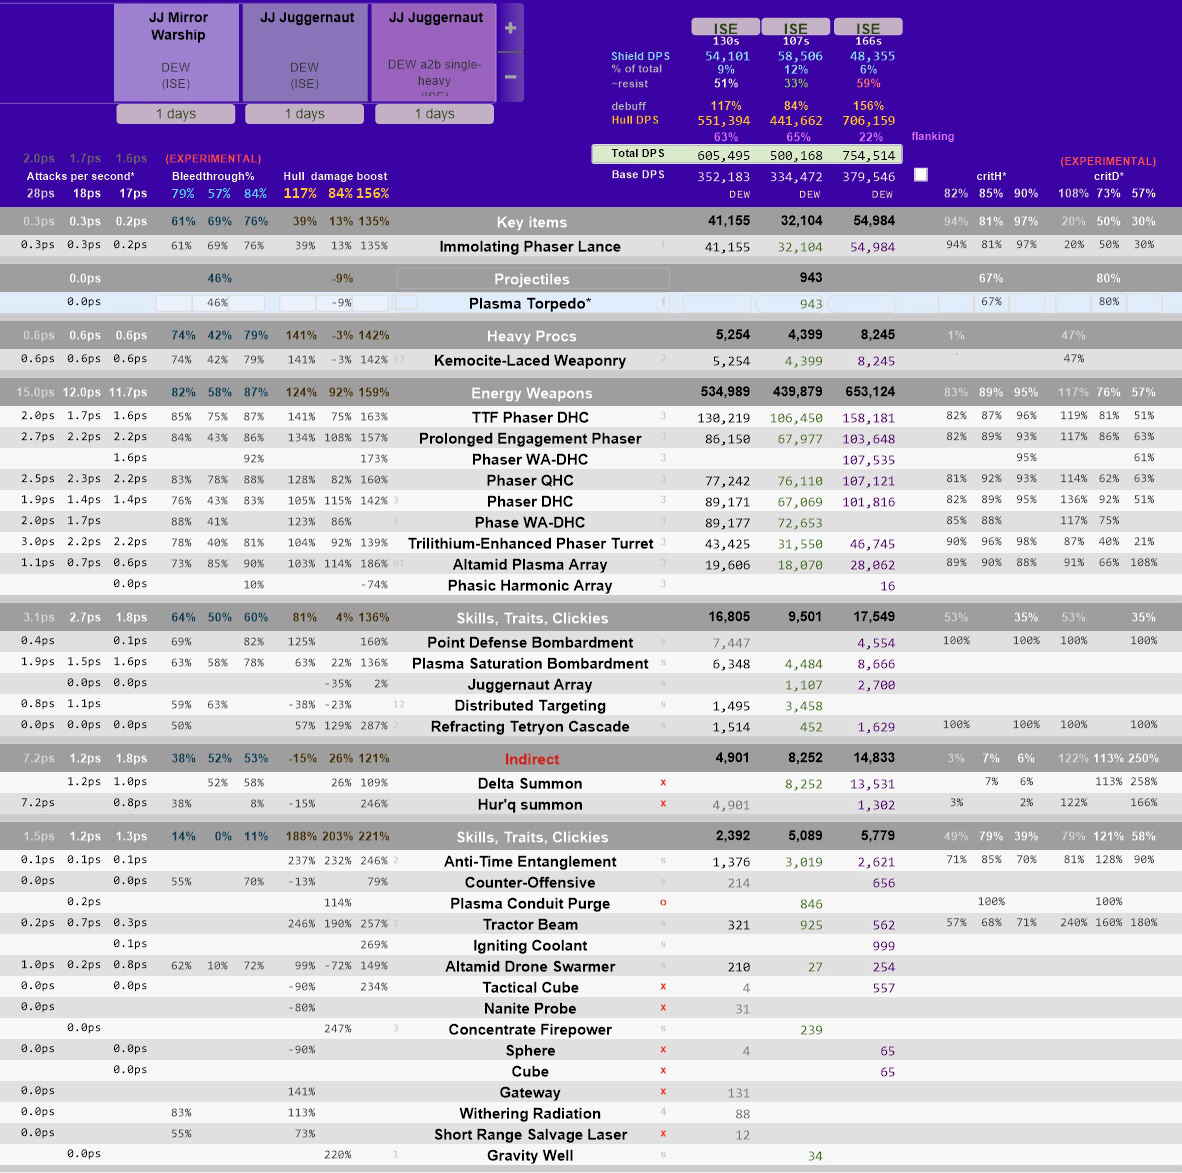
ISE – differences vs ISA
For the most part, all of the ISA elements follow through into the ISE combat results, but certain things start to show up more.
- TTF DHC steals the show — the nature of these weapons gives them the most output at the time of the greatest set of targets and debuffs.
- All of the remaining DHCs settle into a more consistent output pattern — showing less differentiation, depending on your actual flight pattern.
- The ‘omni’ pulls a bit more of its own weight.
- Secondary skills only rise slightly — but those add up. Dots stay up longer, AOEs tag more targets, and their debuffs stay around longer.
JJ’s Reflections
This project began for Sukobi and I before Christmas 2020. We had been discussing the natural progression of my DEW builds as I specialised in DEW after a year of STO. It became evident that acquiring the Vaadwaur Miracle Worker Juggernaut was going to be the logical final step in challenging the DEW DPS chase.
We debated the possibility of new releases that would usurp the vessel and came to the conclusion in February, that there was very little room to manoeuvre to outperform the Juggernaut for Cannons. In March I pulled the trigger.
From then, I ran the testing and Sukobi the analysis. We tweaked builds endlessly and analysed the runs of others, sought opinions and challenged the statements of some of the top players in STO and tested further.
Three areas completely altered performance and during this time, I progressed from 450k dps to 750k dps as we worked out the reasons, through our analysis. These 3 key factors were:
- Tray Layout
- Prebuffing
- Spiking the initial phase
It was particularly the 3 weeks we spent analysing how to spike and testing it that really changed our understanding of the dps race in ISA/ISE. Once we had figured that out and applied it, we only had to fine tune.
Fine tuning had its own stages too.
- Was the Immolating Phaser Lance the right choice in the build? It was up against Bio-Neural Infusion Circuits and the M6 Tactical Computer.
- Was Point Defense Bombardment Warhead better for the build? It was up against Bio-Neural Infusion Circuits and the M6 Tactical Computer too.
- What was the Altamid Set and why was it so highly regarded at the cost of two rear slots?
Of course, piloting remained and still is a great challenge with the Vaadwaur Miracle Worker Juggernaut. The best DEW player in the game, MB Whiscool said to me of the ship, getting the parse run that you publish in a Juggernaut requires a 1 in a 100 run, and based on the amount of testing we did, he was right.
Once we finally had everything where we were convinced we had the right build for the peak vessel, we worked backwards to the F2P build in Part 1. We consulted, analysed and put ourselves in the shoes of the players that would adopt these builds, tested them, parsed them and recorded them for presentation.
In total we had analysed 15 different weapons, 19 different consoles and countless combinations and parses.
Conclusions
The Gagarin demonstrated the capability of a mixed build, but I am under no illusions that this falls behind the full cannon build. As Sukobi noted, if your Tactical Locators focus on DEW, then invariably energy will move ahead. Whether you can balance Tactical Locators to benefit both DEW and Kinetic and create a mixed build that challenges and surpasses the Cannon Builds of this Series is a question for another day.
The Altamid Set was a game changer and haste as a modifier is absolutely integral to DEW builds. However, in ISA we learnt that a point can be reached where haste is wasted. If you notice on the Juggernaut ISA video, the cubes die so fast that some haste ‘could be’ wasted and in that instance, additional crit may be beneficial. If that is the case, the M6 console begins to have the potential to move out of favour.
DPRM, in my opinion, is not worth the current cost, unless specifically used by a tank or for those requiring its survival potential, but having it is a wonderful addition to a build.
The Key Components of this Series have been:
- Cannon: Scatter Volley III
- Starship Trait: Emergency Weapon Cycle
- Starship Trait: Withering Barrage
- Terran Task Force Dual Heavy Cannon
- Trilithium 2 Pc
- Altamid 3 Pc
- Tactical Locators
Starship Traits and Lobi Gear, I feel, made the biggest build improvements. For this reason, I would be remised to not remind the Fleet that 1,500 Lobi is currently (2021) on offer as a reward for the Meta-Event and this will naturally go much further than any single ship that you might otherwise purchase, if your aim is chasing DPS.
Finally, I’d like to say that whilst at this moment I hold the Fleet DPS records in ISA (455k) and ISE (752k), I know there are better DPSers in the Fleet, having flown with many of them regularly. If the guidance in this Series is properly applied, I know my record will not stand for long; I am watching G’Luv and Volidon in particular as the front runners to knock me off my perch – good luck, because I too will be pushing more and more!
I hope you have found this series, co-written by Sukobi and I, informative and helpful and as always, we remain ever present for help and further advice.